ARI’s Building Manager#
The Building app covers the management operations related both to buildings and maps. It is divided in three different sections:
the Building Manager tab, which covers building management,
the Map Manager tab, which covers map management and
the Update Map tab, which allows modification and merging of existing maps and their updates.
Building Manager Tab#
The Building Manager tab lists all existing buildings and allows operations such as Building Creation, edition and removal.
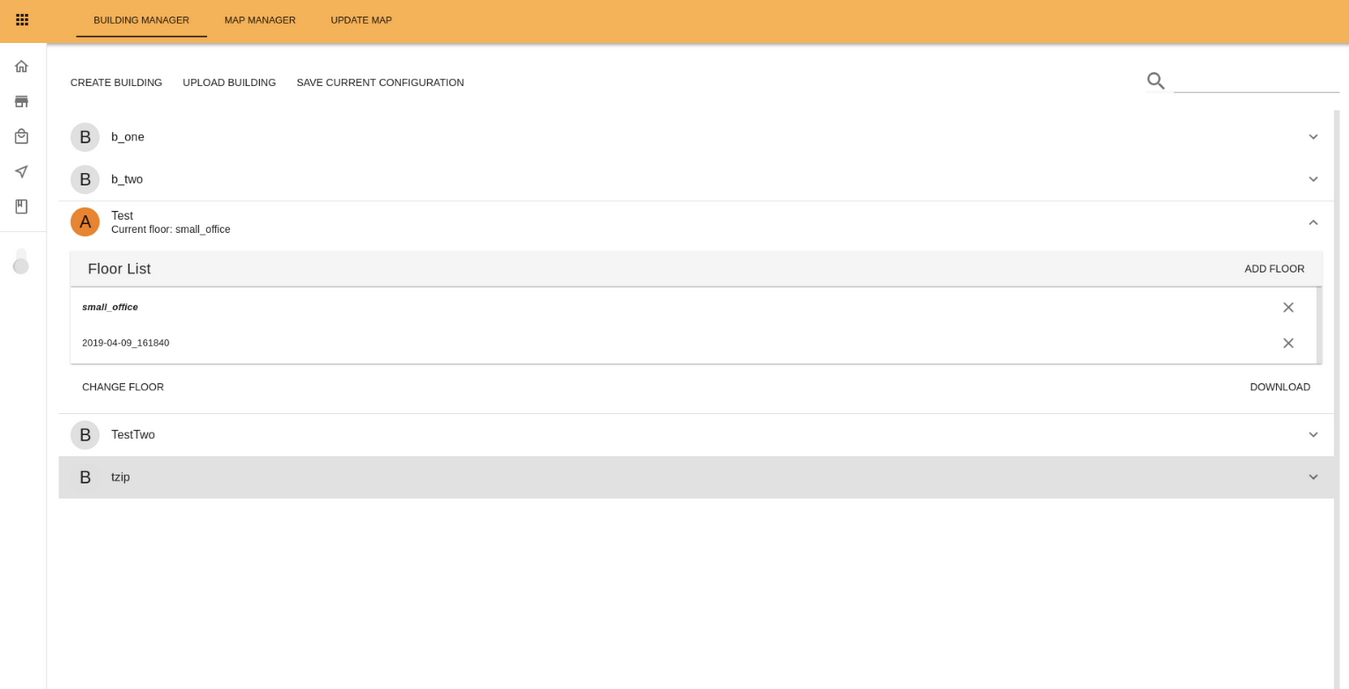
The menu at the top left side displays three buttons:
The Create Building button opens a popup that allows the creation of a new building. Enter the name of the building and then choose a map for the first floor of the building. This map must contain the POIs for a dock station (
dock stationanddocked_pose).The Upload Building button opens a popup that allows you to upload a building. First, assign a name to the building that will be uploaded. Then, select the zip file containing the updated building.
Note
The uploaded building must have the same structure as that of the buildings downloaded through the Download button of a specific building.
The Save Current Configuration button stores the current WiFi configuration, as well as the current Task configuration on the building the robot is currently in (the
active building).
On the top right menu a Search field allows you to filter the list of buildings by name.
The list of buildings shows the buildings configured on the robot. The currently active building is shown with an orange icon next to it. In addition, the currently active floor is shown as well. Clicking on any of the buildings will expand the information shown on that building. A list is shown with all the floors of the building, with the first floor of the building in bold, and the currently active floor, if any, initialized.
At the top of the list, the Add Floor button opens a popup with a dropdown menu to select a map to be added as a new floor to the building. Clicking on the X next to each floor will remove that floor from the building.
On the lower left-hand side you will either see:
the Set As Current button, if the building is not active. To activate it, press on this button. A popup will ask you to choose a floor on that building and then set that floor as the currently active one;
the Change Floor, if the building is the active one. You can change floor and set it as the active one by pressing on this buttton.
In addition, two other buttons are always shown on the lower right-hand side:
Download, which downloads the building configuration in zip format.
Remove, which allows you to remove the building from the robot after a confirmation dialog. This action can be undone.
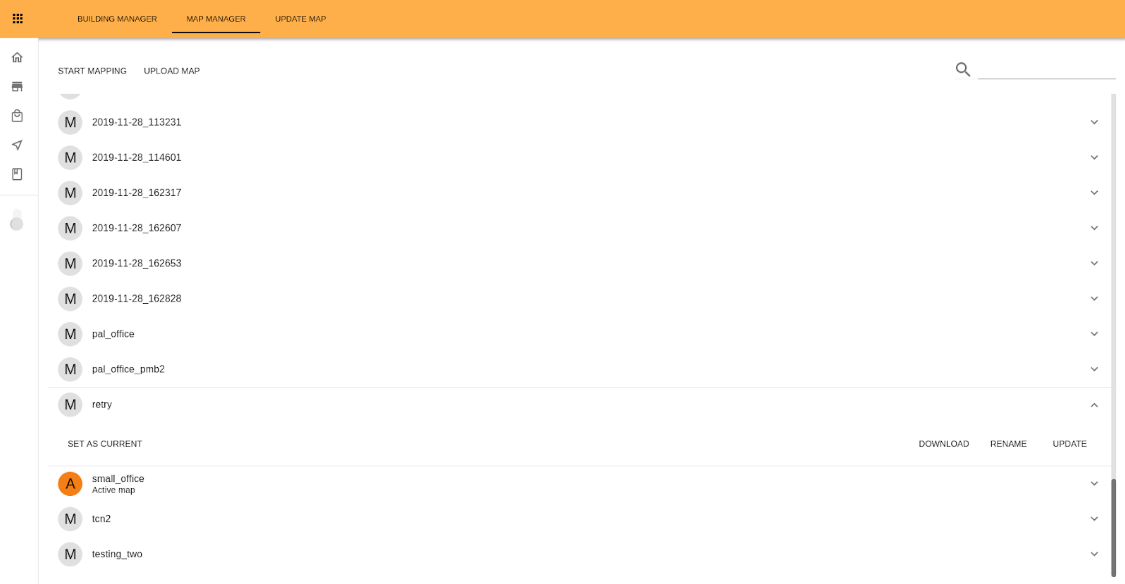
Map Manager Tab#
The Map Manager tab lists all existing maps and allows operations such as starting a new map, uploading a new map or changing the currently active map.
Note
This section only describes the interface options in the mapping process. To further learn more about mapping and navigating check the WebGUI-based Navigation page.
The Start Mapping button will start the mapping process. It will show a window around the robot with the map that is being created.
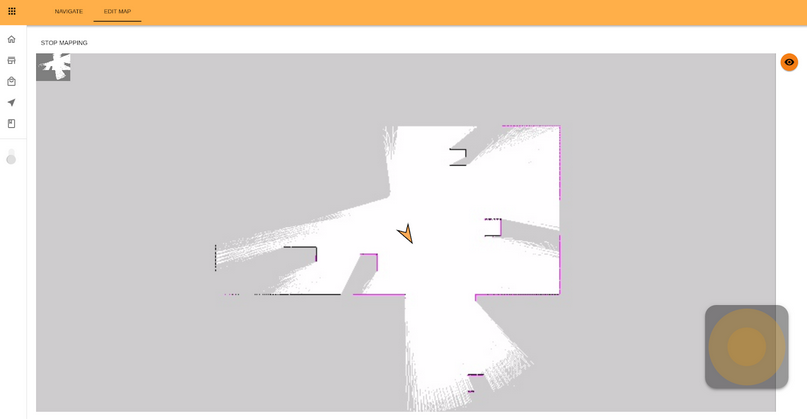
The Stop Mapping button will replace the Start Mapping one shown on the top left menu. When you are done with mapping process, press on it to stop the procedure. A popup will appear to set the name of the new map.
Clicking on the minimap displayed at the top left corner of the mapping area will open a bigger version of the completed map.
The Eye icon on the top right side allows hiding or showing the minimap (which is shown by default).
The Joystick on the lower right side allows you to control the robot.
The Upload map button opens a popup that allows you to select a zip file on your computer (which must have the same structure as that of the maps downloaded through the Download Map button), set up a name for the map and upload it on the robot.
On the top right menu a Search field allows you to filter the list of maps by name.
The list of maps shows all existing maps on the robot. The currently active map is shown with an orange icon next to it. Clicking on any of the maps will expand the options on that map. If the map is not the active one, press on the Set As Active button shown in the lower left side to activate it after a confirming it through the popup.
On the lower right side three buttons are shown:
The Download button downloads all the information of the map as a zip file.
The Rename button opens a popup to change the name of the map.
The Update button switches to the Update Map tab with this map preselected as the
Source Map.
Update Map Tab#
The Update Map tab allows you to visualize and apply updates to the maps loaded on the robot.
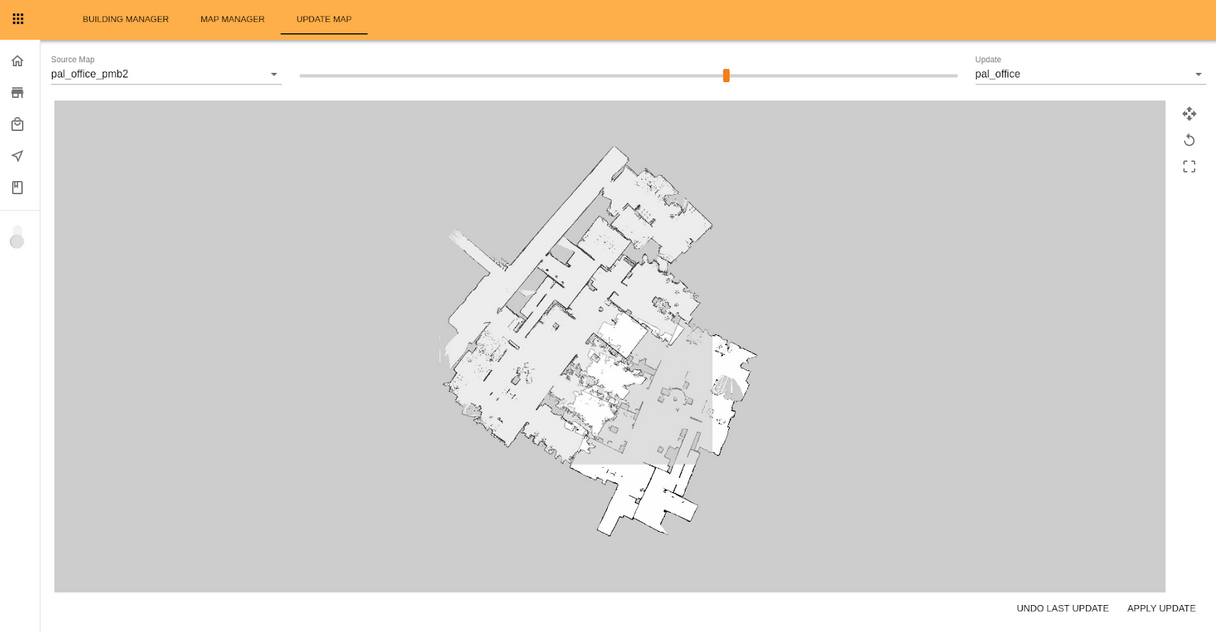
On top menu we find the following options:
The Source Map dropdown list allows you to select which of the available maps to work with.
The Update dropdown list allows you to select which update or other map will be used to update the source map.
A slider between both dropdowns allows changing the transparency to visualize the differences. When the slider is at the right side only the updated version is displayed. Moving the slider to the left makes the updated version of the map transparent so the differences can be seen. When the slider is at its left side only the original map is displayed.
The main component of the page shows both the source map with its update. The view can be zoomed in and out using the mouse wheel, and can be panned by drag-and-drop with the mouse wheel button.
At the right side of the map three buttons are displayed:
The Move Map button (represented with four arrows) activates the
move mode. In this mode the updated map can be moved by dragging and dropping it with the left mouse button. When activating this mode the updated map will be made transparent so both maps can be seen. While in this mode the button will change to a ✔ icon. Click on it to exit themove mode.The Rotate Map button (represented with a circular arrow) activates the
rotate mode. In this mode the updated map can be rotated around its center by clicking on the map with the left mouse button and then dragging it. While in this mode the button will change to a ✔ icon. Click on it to exit therotate mode.The Update Area button (represented with a dashed square) allows you to select a region to update. The area is drawn by clicking with the left mouse button and then dragging, to create a basic rectangle shape of the desired dimensions. Once this is done, the vertexes can be dragged and dropped into position, and new vertexes can be added by clicking anywhere along the edges. While in this mode the button will change to a ✔ icon, click on it to exit update area mode.
Clicking on any of the other buttons while in a particular mode (i.e. clicking
on the Rotate Map while in Move Map mode) will automatically
change the mode.
At the bottom-right side of the page two buttons are shown:
The Undo Last Update button allows you to undo the last update that was applied to the selected map.
Note
Only the last update can be undone. Additional clicks on the button will not have any effect.
The Apply Update button will update either the selected area (if any), or apply all the
Updateto theSource Mapafter a confirmation popup.
After a map update is performed it is possible that some of the existing POIs
are now located inside or too close to an obstacle. In that event, a popup will
appear warning about the fact, and the affected POIs will be displayed
in red color in both the Map and Map Manager tabs, until those
POIs are edited. The robot will still try to navigate to those POIs even if they
are not edited. It will simply try to get as close as safely possible to the
location and orientation of the POI.