ARI networking#
When shipped or when a fresh re-installation is performed, the robot is configured as an access point. The information about the robot’s network is provided in the table below. Note that the SSID ends with the serial number of the robot, i.e. in the given example the s/n is 0.
SSID |
|
Channel |
|
Mode key |
|
Password |
|
Robot IP |
|
The address range 10.68.0.0-24 has been reserved. The robot computer name is
ari-Xc, where X is the serial number without the “0s” on the left. The
alias control is also defined in order to refer to the computer name of the
robot when connecting to it when it is set as access point or when using a
direct connection, i.e. an Ethernet cable between the robot and the development
computer.
Network configuration#
In order to modify the Networking settings of the robot you must do so from the Web Commander, see WebCommander for general information.
The figure below shows the networking tab. By default, the controls for changing the configuration are not visible in order to avoid access by multiple users.

If the Enter button is pressed, the tab connects to the networkconfiguration system and the controls shown in the figure below will appear.
When a user connects to the configuration system, all the current clients are disconnected and a message is shown in the status line.
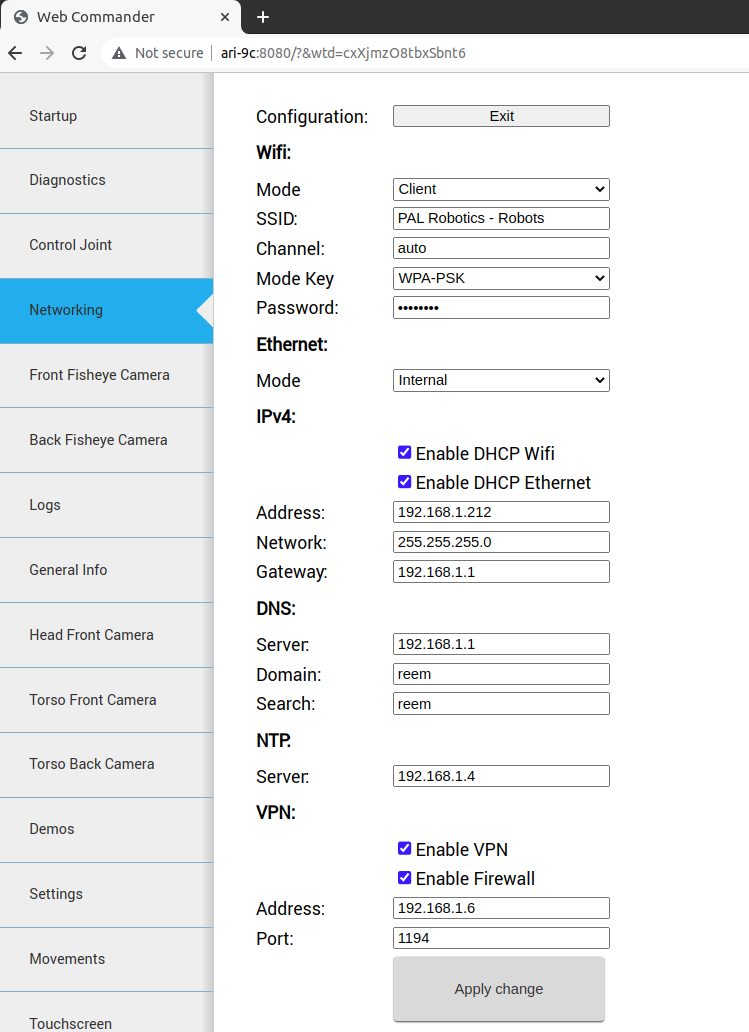
Network configuration panel#
Configurations are separated in different blocks:
Wifi:
Mode: Can be selected whether WiFi connection works as client or access point.
SSID: ID of the Wi-Fi to connect to client mode or to publish in access point mode.
Channel: When the robot is in access point mode, use this channel.
Mode Key: Encryption of the connection. For more specific configurations select manual. In this case it is used the file /etc/wpa_supplicant.conf.manual that can be manually created in the robot.
Password: Password for the WiFi connection
Ethernet:
Mode: Can be selected whether the ethernet connection works as an internal LAN or external connection(see Expansion Panel section).
IPv4:
Enable DHCP Wifi: Enables DHCP client in WiFi interface.
Enable DHCP Ethernet: Enables DHCP client in the external ethernet port.
Address, Network, Gateway: In client mode, the manual values of the building’s network are used by the Wi-Fi interface. This is the same for the external ethernet port.
DNS:
Server: DNS server.
Domain: Domain to use in the robot.
Search: Domain to use in the search.
VPN:
Enable VPN: If the customer has a PAL basestation, the robot can be connected to the customer’s VPN.
Enable Firewall: When activating the VPN, a firewall can be connected to avoid an incoming connection from outside the VPN.
Address: Building network IP address of the basestation.
Port: Port of the basestation where the VPN server is listening.
No changes are set until the Apply change button is pressed.
When the Save button is pressed (and confirmed), the current configuration is stored in the hard disk. Be sure to have a correct networking configuration before saving it. A bad configuration can make it impossible to connect to the robot. If this happens, a general reinstallation is needed.
Changes to the WiFi between client and access point could require a reboot of the computer in order to be correctly applied.
Using the diagnostic tab, it is possible to see the current state of the WiFi connection.
Connecting to a LAN#
In order to connect to your own LAN follow the steps below.
First of all you need to access the WebCommander via the URL http://ari-0c:8080 and go to the Networking tab. Press Enter button and then follow the instructions shown in figure Network configuration panel.
Once you have filled in the right configuration and pressed the Apply change button it is very important to wait until you are able to ping the new robot IP in your own LAN. If it does not happen you might have to reboot the robot as the configuration changes have not been saved yet. The robot will reboot with its previous networking configuration, allowing you to repeat the process properly.
When the new configuration allows you to detect the robot in your own
LAN then you may proceed to enter the WebCommander again and press
the Save button and then the Confirm button.
Setting as an Access Point#
In order to configure ari as access point open the WebCommander via the URL http://ari-0c:8080 and go to the Networking tab. Press Enter button and then follow the instructions shown in the figure below.
Once you have filled in the right configuration and pressed the Apply change button it is very important to wait until the new Wi-Fi network is detected. A smartphone, a tablet or a computer provided with a WiFi card can be used for this purpose. If it does not happen you might have to reboot the robot as the configuration changes have not been saved yet. The robot will reboot with its previous networking configuration, allowing you to repeat the process properly.
When the new configuration allows you to detect the robot’s Wi-Fi then
you may proceed to enter the WebCommander after connecting to the
Wi-Fi of the robot and press the Save button and then the
Confirm button.