VPN network configuration#
In this mode, the robot integrates with your company’s or institution’s building infrastructure like any other network device.
The router will function as a standard WiFi client device, utilizing just one IP address on the network. However, since the robot consists of multiple machines, individual access to each one is necessary.
This is achieved using a VPN protocol, which facilitates seamless communication with the robot, irrespective of the building network’s complexity.
Please note that the robot remains accessible as an access point (Standalone Mode), regardless of its connection to the network infrastructure or Internet access.
Assuming the robot is already connected to the building network, the development computers have to be integrated into the robot’s VPN.
Step 1: Login#
Log in the router pointing to http://10.68.0.5 as described previously.
Step 3: Utils#
Install a Wireguard client in your development machine. There are clients for the majority of operating systems (Linux, MacOS, Windows, Android, iPhone,…)
For example, in Ubuntu, please, just install wireguard-tools
sudo apt install wireguard-tools
Step 4: Interface#
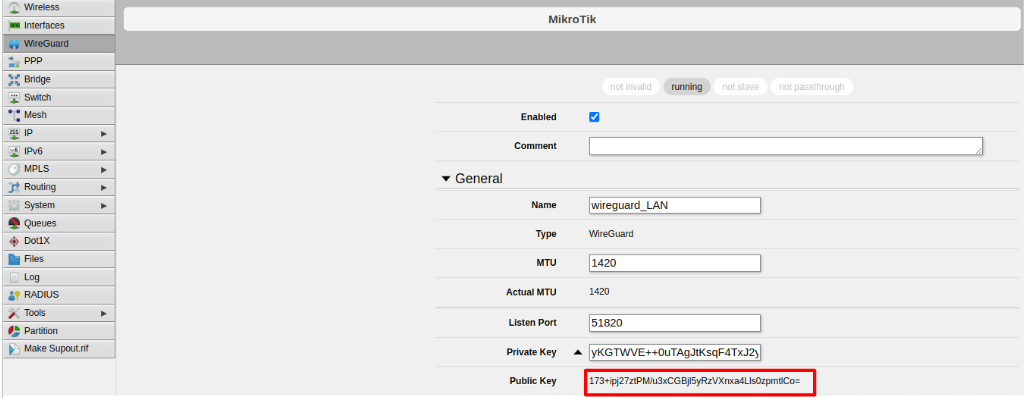
Take note of the WG LAN public key (NOT the WG WAN) of the robot as shown in the following screenshot labelled as Public Key:

Step 5: Key generation#
Create a private and a public Wireguard key in your workstation using the Wireguard tooling like this:
sudo cat /etc/wireguard/private.key | wg pubkey | sudo tee /etc/wireguard/public.key
Step 6: IP details#
Choose a Wireguard LAN IP for your workstation
The address shall correspond to the subnet specified in the router which is not already assigned like 172.24.X.100 and above.
The following IP addresses are NOT allowed as they are already assigned to the following computer as described in the following table:
Control PC |
|
Multimedia PC |
|
Router PC |
|
Step 7: Peers#
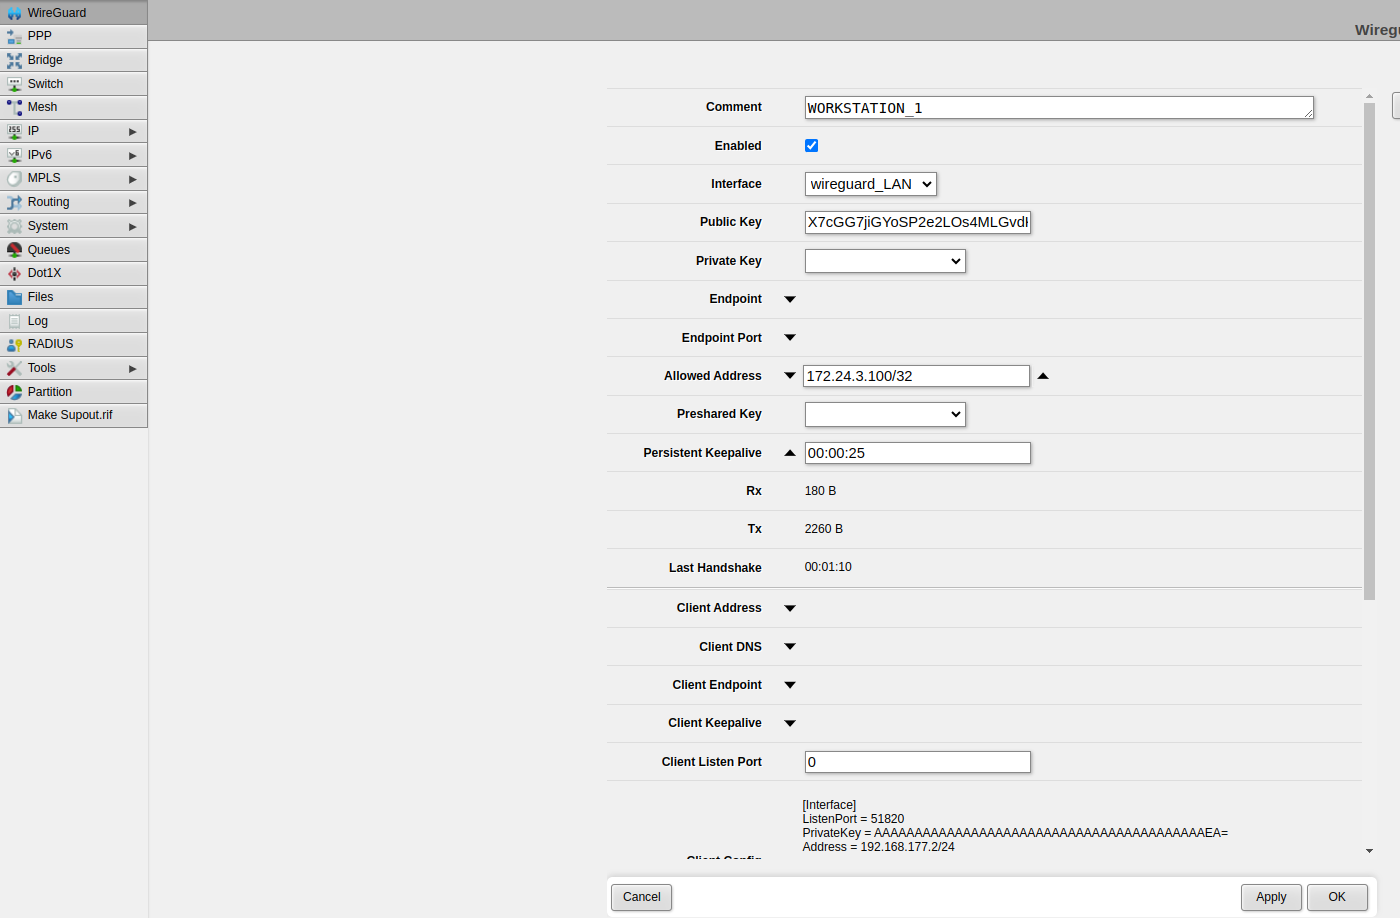
Create a new peer on the robot’s router.
Choose wireguard_LAN as the interface.
Copy your public key (the one you generated) to the Public Key field in the router configuration.
In the Allowed Address field, enter the WireGuard IP address assigned to your workstation. This address should be in the format 172.24.X.Y/24, where X corresponds to the WireGuard network of the robot and Y is the octet designated for your workstation.
For the first workstation, it is safe to use 172.24.X.100/24, for the second one 172.24.X.101, and so on.
Ensure that all other peers are within the same range, 172.24.X.Y/24, and that their IP addresses do not conflict with any existing ones.
Set “Persistent Keepalive” to 25

Step 8: Configuration file#
Create a wg.conf file (In Linux shall be located in /etc/wireguard) like this:
[Interface]
Address = 172.24.X.Y/32
PrivateKey = YOUR_PRIVATE_KEY

[Peer]
PublicKey = ROUTER_PUBLIC_KEY
AllowedIPs = 172.24.X.Y/24
Endpoint = ROBOT_IP:51820
PersistentKeepalive = 25
Substitute ROBOT_IP by the IP address of the robot in your network
Substitute YOUR_PRIVATE_KEY by the generated private key
Substitute ROUTER_PUBLIC_KEY by the router public key you took note
Step 9: Start tunnel#
Start Wireguard interface in your workstation
sudo wg-quick up wg0
If everything went well, you should see transmitted and received traffic issuing
sudo wg show wg0
And you should be able to ping the router’s tunnel IP:
ping 172.24.X.5
And the robots’ pcs tunnels:
ping 172.24.X.1
ping 172.24.X.2
...
