Network configuration#
Attention
We do not consider PAL’s robots to be hardened IT systems. In particular, they expose their complete ROS 2 environment to any device connected to the same network.
If your use-case implies exposure to IT/networking risks, we strongly recommend implementing mitigations at the level of your network infrastructure and controlling the physical access to the robot.
Overview#
When shipped or when a fresh re-installation is performed, the robot is configured as an access point. The information about the robot’s network is provided in the table below. Note that the SSID ends with the serial number of the robot, i.e. in the given example the s/n is 0, and where <robot> is the the type of the robot, e.g. tiago, tiago-dual, ari, etc.
SSID |
|
Default password |
|
Robot IP |
|
The address range 10.42.0.1/24 has been reserved. The robot computer name is
<robot>-0c, where 0c is the serial number without the “0s” on the left. The
alias control is also defined in order to refer to the computer name of the
robot when connecting to it when it is set as access point or when using a
direct connection, i.e. an Ethernet cable between the robot and the development
computer.
The robot uses Netplan to manage the network configuration. You can find more information on the Netplan documentation. By default the backend used is NetworkManager.
The robot includes several networking components: a router, a control computer, and a multimedia computer.
The router features two WiFi interfaces and five Gigabit Ethernet interfaces.
When shipped, the robot access point is accessible. The information about the robot’s network is provided in the table below. Note that the SSID ends with the serial number of the robot, i.e. in the given example the s/n is 0.
SSID |
|
Mode key |
|
Default password |
|
Control PC IP |
|
Multimedia PC IP |
|
Router IP |
|
In order to modify the network configuration, connect to the robot Access Point and log in the router pointing to http://10.68.0.5
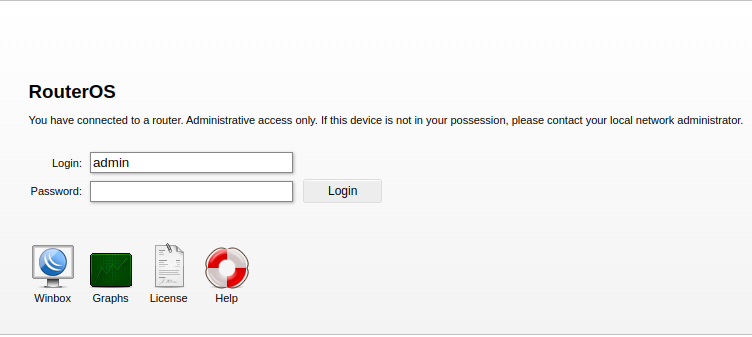
where the default credentials are the following ones:
Login |
|
Password |
|
To change the default password for the router, navigate to the menu. The following screen will appear, allowing you to change the password:

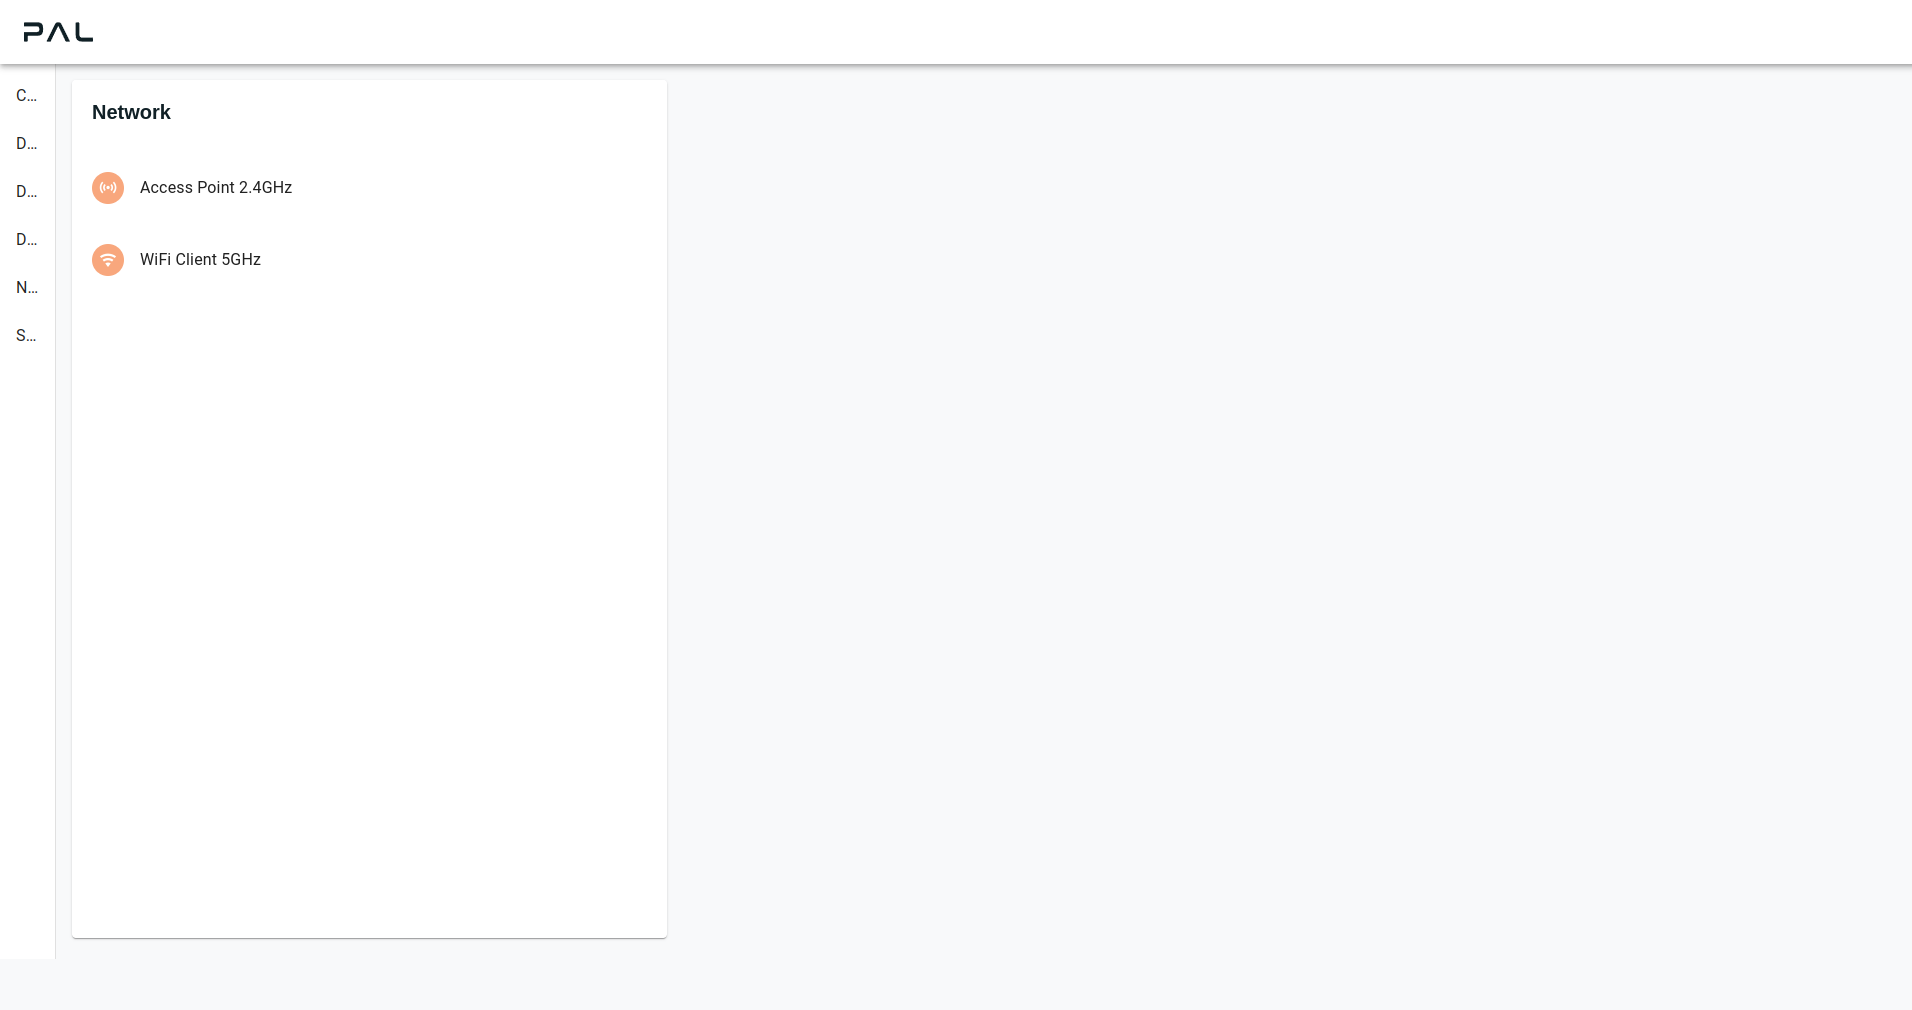
You can also use the Networking web app inside the WebGUI to manage the robots wireless interface configurations. In your browser go to http://robot-sn/networking, for more information check how to access the web-user-interface .
You will be presented with the following screen of the Networking app, from where you can configure the Access Point and WiFi client interfaces.
General network configuration#
To modify network settings on the robot from the WebGUI access the Networking App on http://robot-0c/networking
Web Interface
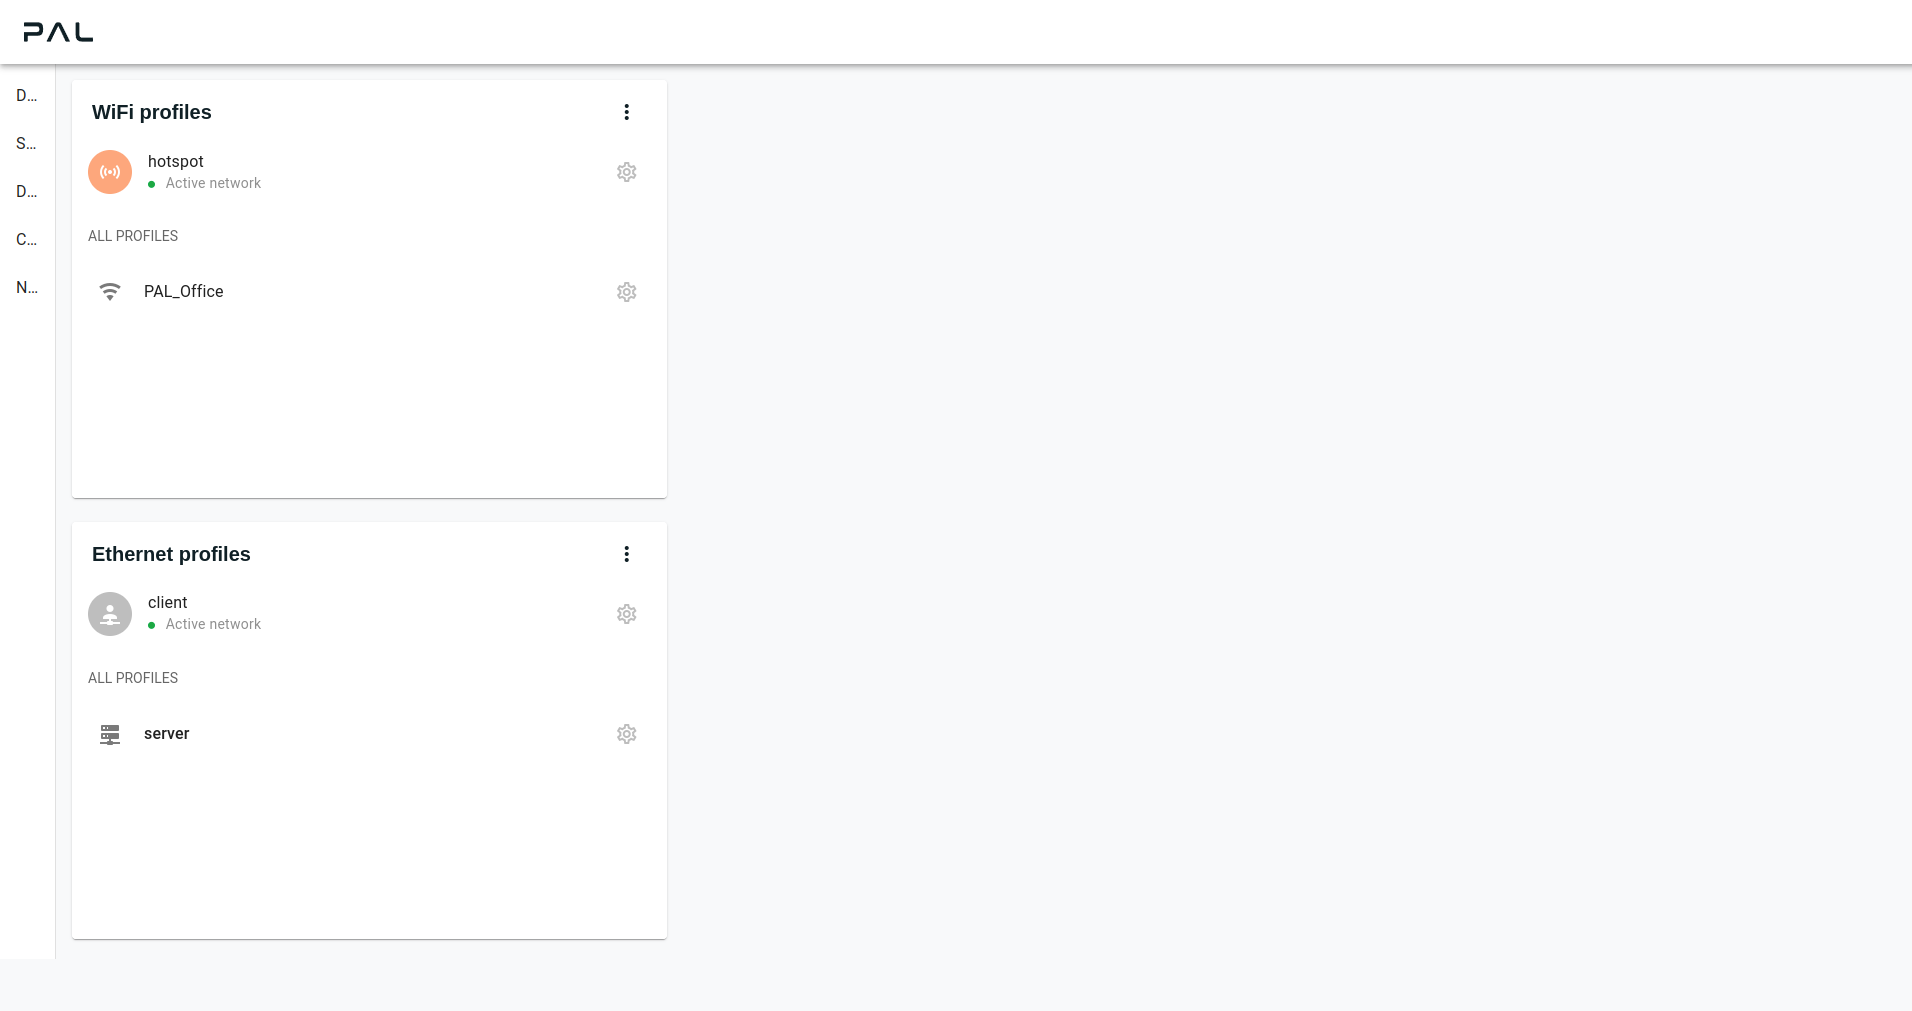
When first entering the interface, you will be presented with the following screen:
Profile groups
There are two profile list groups:
WiFi Profiles
Wired Profiles
A profile is the network configuration that can be created and managed by the user. You can enable a profile to set it as the active configuration for the network settings.
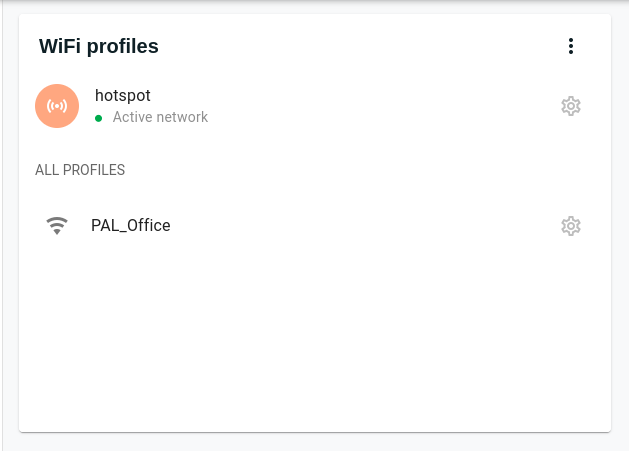
Example with WiFi profiles group:
Note
The items explained further have the same structure and options apply for the both WiFi and Wired groups.
The network groups have the following items (the given examples / names are based on the WiFi group):
Group title: “WiFi Profiles”, shows the name of the group the profiles belong to.
Group context menu, click to open the context menu, from here you can add a new profile to the group or disable the network group. In this example, it would mean it will turn off the WiFi.
Add new profile: Opens the editor to create a new profile
Disable WiFi network: Prompts you to confirm the network disabling (like WiFi or Wired).
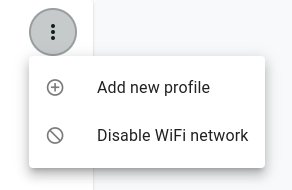
Group context menu#
Warning
Disable WiFi network option allows turning the WiFI network off permanently until you enable it again. If both network groups are disabled, it means the only way you can connect to the robot is physically using an ethernet cable.
Active profile: shows the profile that is being used currently for a network group (WiFi or Wired). Both groups can have a profile active meaning that the network group is enabled.
Mode identification icon: each profile will show a different icon depending on what mode it is.
Custom mode
: When a profile is created using the advanced mode (inserting the YAML configuration), there can be some fields that the parser does not understand.
WiFi Access Point mode
: the robot functions as a WiFi access point, allowing other devices to connect to it.
WiFi Client mode
: the robot connects to a WiFi network as a client, allowing to connect to the Internet and other resources on the network.
Wired client mode
: the robot connects to a network using a wired connection. This mode allows the robot to access the network and communicate with other devices on the same network.
Wired server mode
: The robot functions as a network bridge, connecting multiple wired network segments. In this mode, the robot manages the bridge connection, facilitating and directing traffic between the different network segments.
All profiles: list of all the available profiles previously created. It can be empty if the profiles list contains only one profile and it is active (example below).
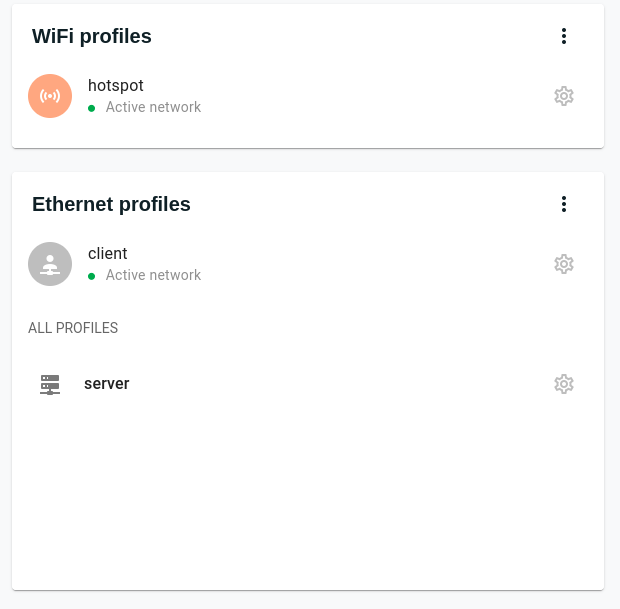
All profiles list item
: shows the name of the profile and the context menu to manage the profile.
Set as active Sets the selected profile as active configuration for the group. You will be prompted to confirm setting the profile as active.
Note
Depending on the active configuration you might lose connection to the robot. The change of active profile is a permanent action. Once it is done your device will lose connection to the robot until you reconnect with the new configuration.
Edit: Open editor to edit profile configuration.
Note
Some profiles come by default (default profiles), these profiles can not be edited or deleted. The following are the names of these default profiles, for WiFi: hotspot, and for Wired: server and client.
Copy and edit: Use it to create a new profile starting from the same configurations.
Delete: this action is irreversible. You will be prompted to confirm the deletion of the profile.
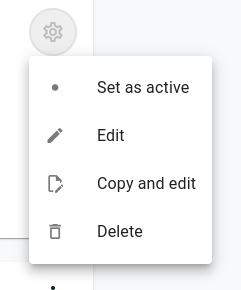
Profile context menu#
Editor
The editor allows you to configure the profile. The editor can be opened in the following ways.
Adding a new profile, click on the Add new profile in the group context menu to open the editor.
Edit an existing profile, select the Edit option from a profile’s context menu.
Create a new profile from an existing one, select Copy and edit from a profile’s context menu.
Clicking on profile, when a profile is clicked,the editor is opened in a view mode, meaning that you cannot edit. A button to enter edit mode is available.
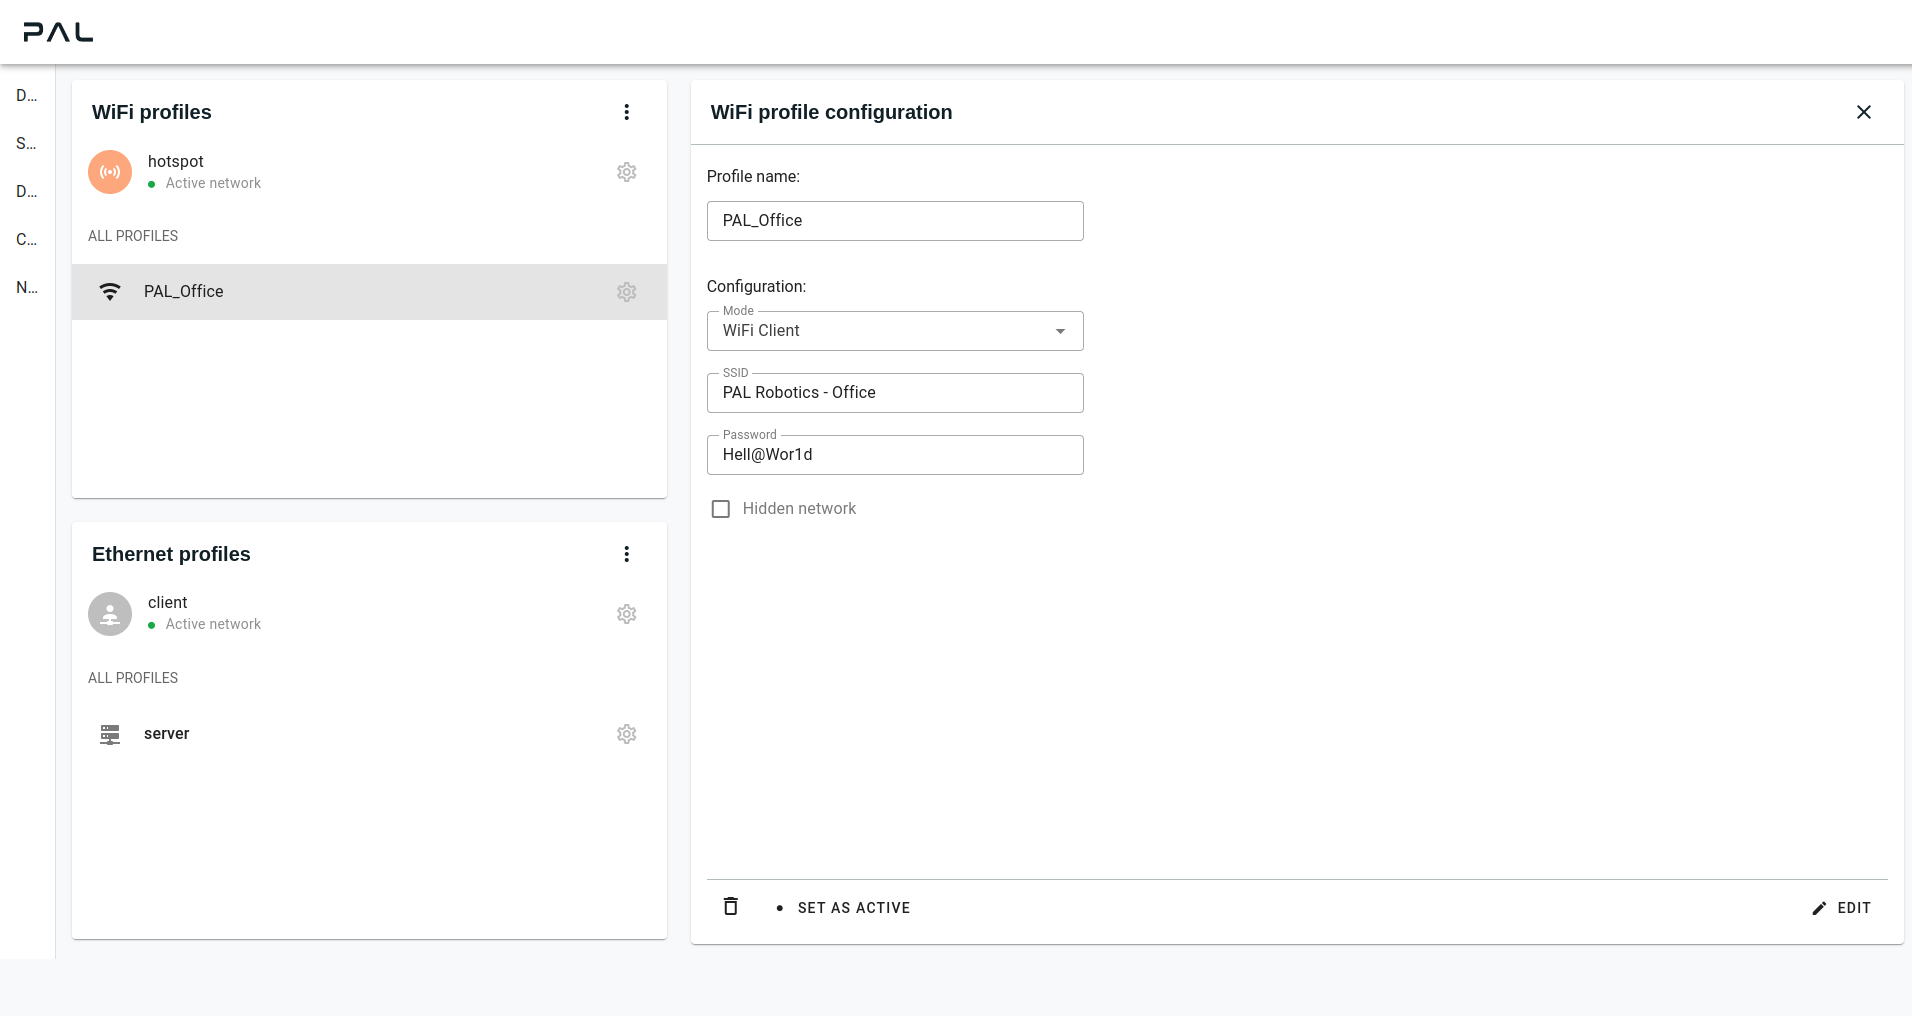
Editor in view mode for a WiFi profile#
Adding a new profile
WiFi
Select Add new profile to create a new network configuration from the group context menu. The editor will open a form with a series of fields, on the left of the editor and a SAVE button at bottom right.
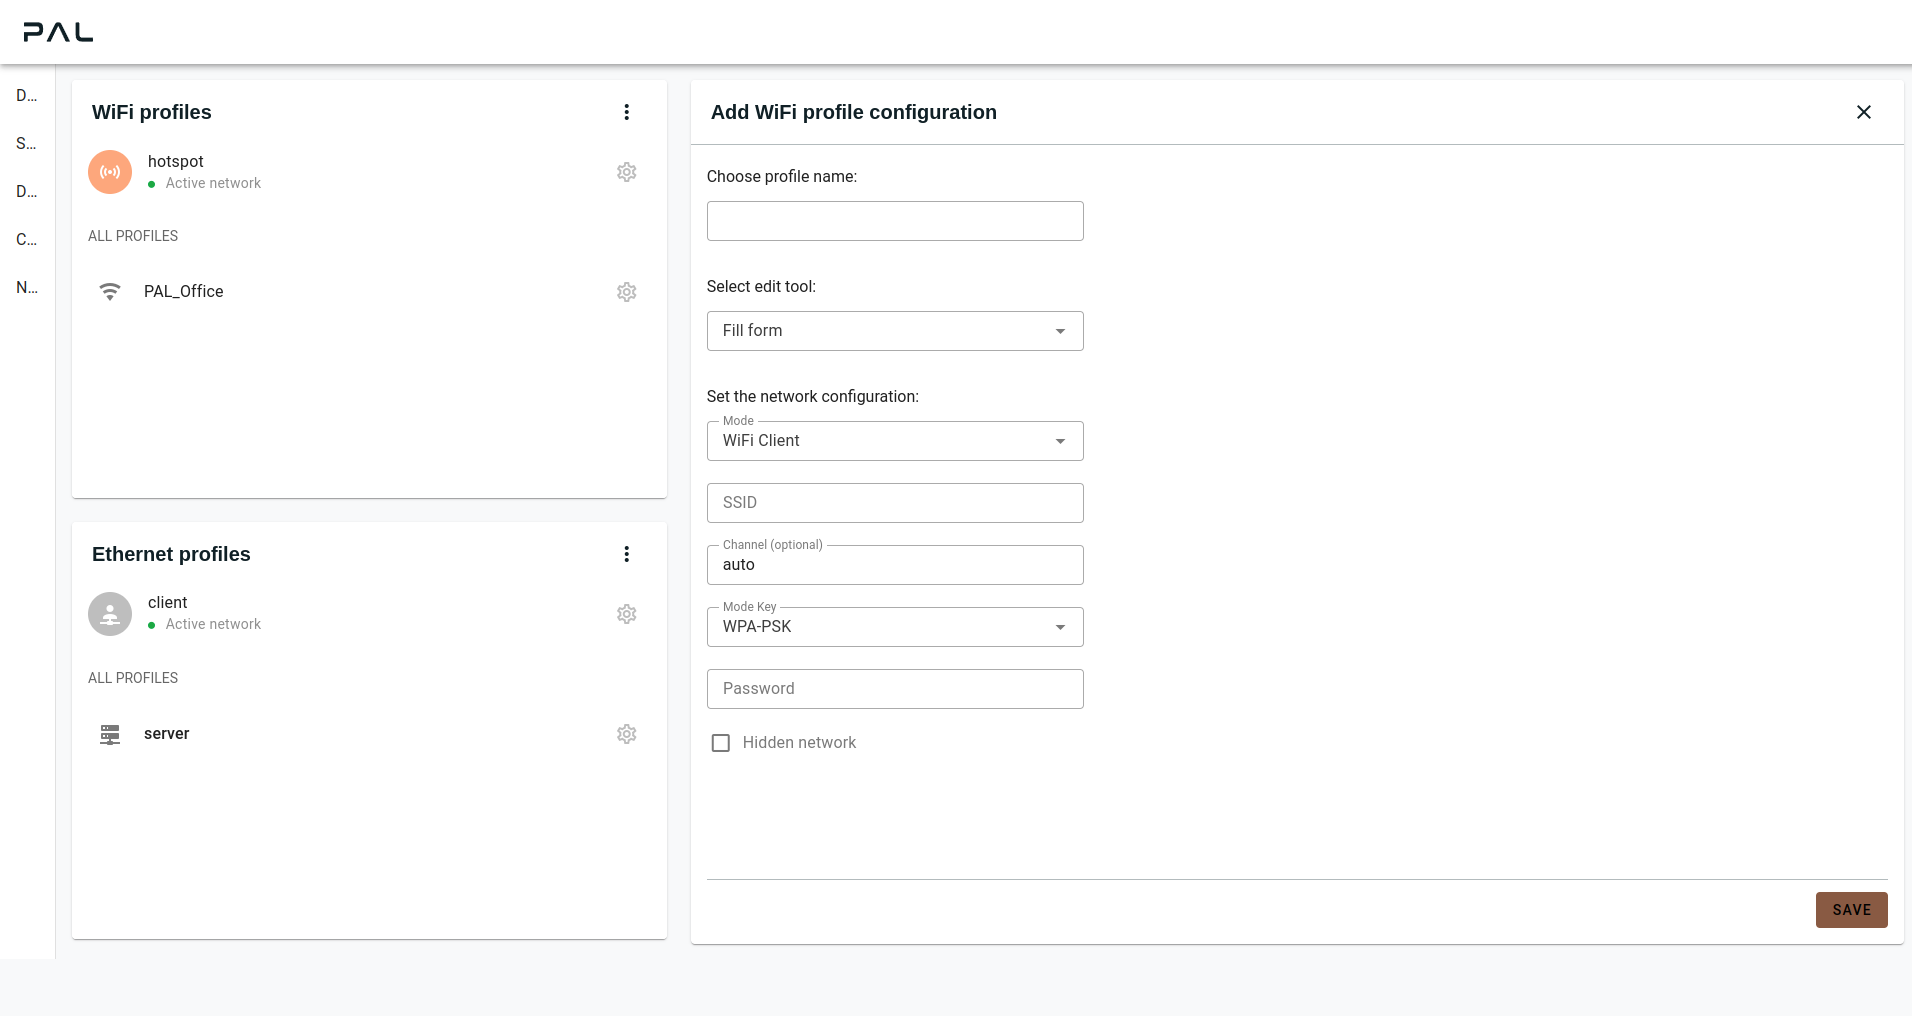
The fields:
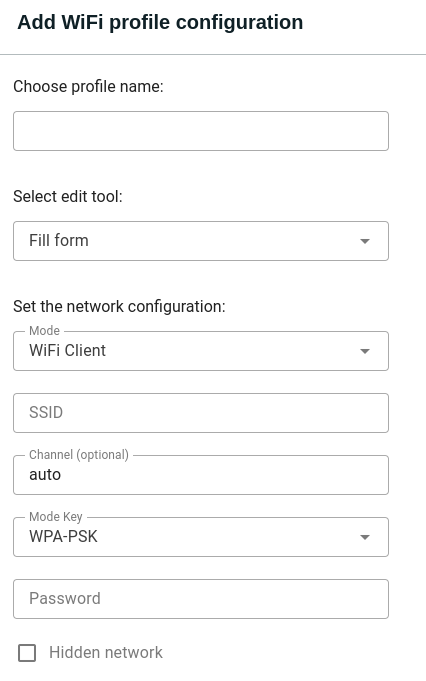
Profile Name: This is the name that is shown in the list of profiles in the group.
Edit tool: For WiFi configuration there are two options to create a profile.
Fill form: Fill out the fields with only the minimum required information for connecting to a WiFi or creating a hotspot.
Mode: Select if the profile will act as WiFi client or as an Access Point.
SSID: Name of the client WiFi or name with which the access point will be discoverable.
Mode key : Security mode of the WiFi network.
Password : Enter password for the client WiFi or set the password for the robot’s access point. For an access point profile the password must meet the following requirements:
Minimum 8 characters
Minimum 1 uppercase character
Minimum 1 lowercase character
Minimum 1 number
Minimum 1 special characters
Hidden: Checkbox to mark if the network is hidden or not. A hidden network is a wireless network that is not broadcasting its SSID. It is invisible to other devices searching for a new network to join.
Example: when setting a robot as an access point and configuring it as a hidden network, the SSID set will not show in the list of your device’s available WiFis list.
Insert configuration: Write the network configuration as if you were editing the file directly or drag and drop an external configuration file (YAML) inside the text field. This is intended for advanced users, you are able to use the full available configuration for Netplan.
Warning
No validation is performed when you save this configuration. So be sure the YAML you typed or inserted is correctly formatted and configured.
Checkout Netplan documentation for more information about the configuration options.
You can validate the YAML with: https://www.yamllint.com/
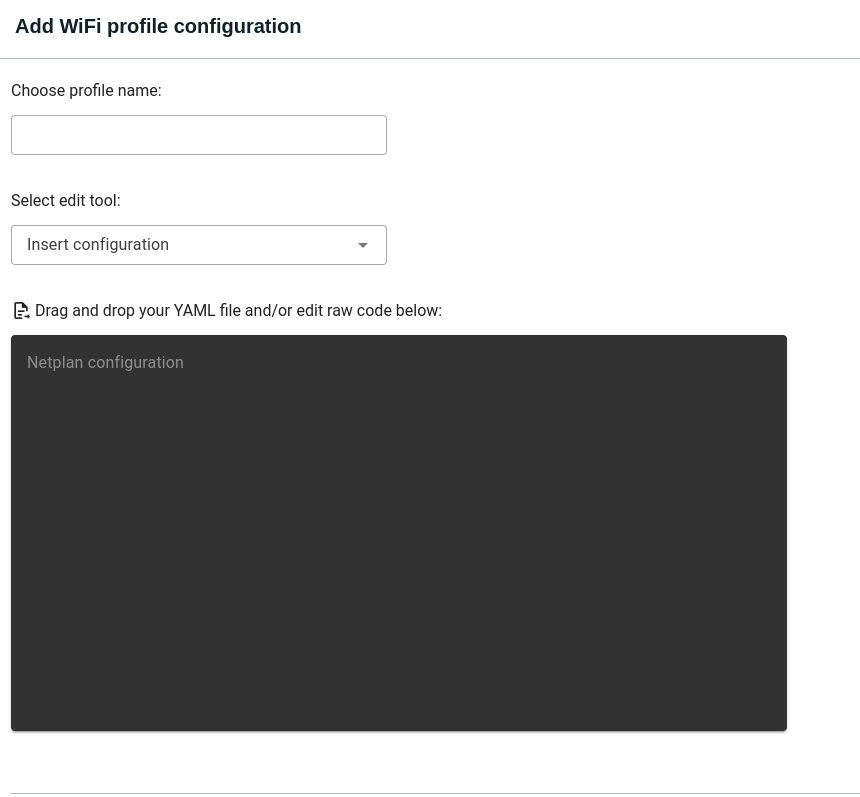
Insert configuration for a WiFi profile#
Click on the Save button to save your configuration and the new profile will be shown in the profile list.
Wired
For creating new wired profiles only “Insert configuration” mode is available. Enter a name for your profile, write the netplan compliant YAML configuration, and save. You also have an option to drag and drop the configuration file inside the text field, so it will be processed as a plain text.
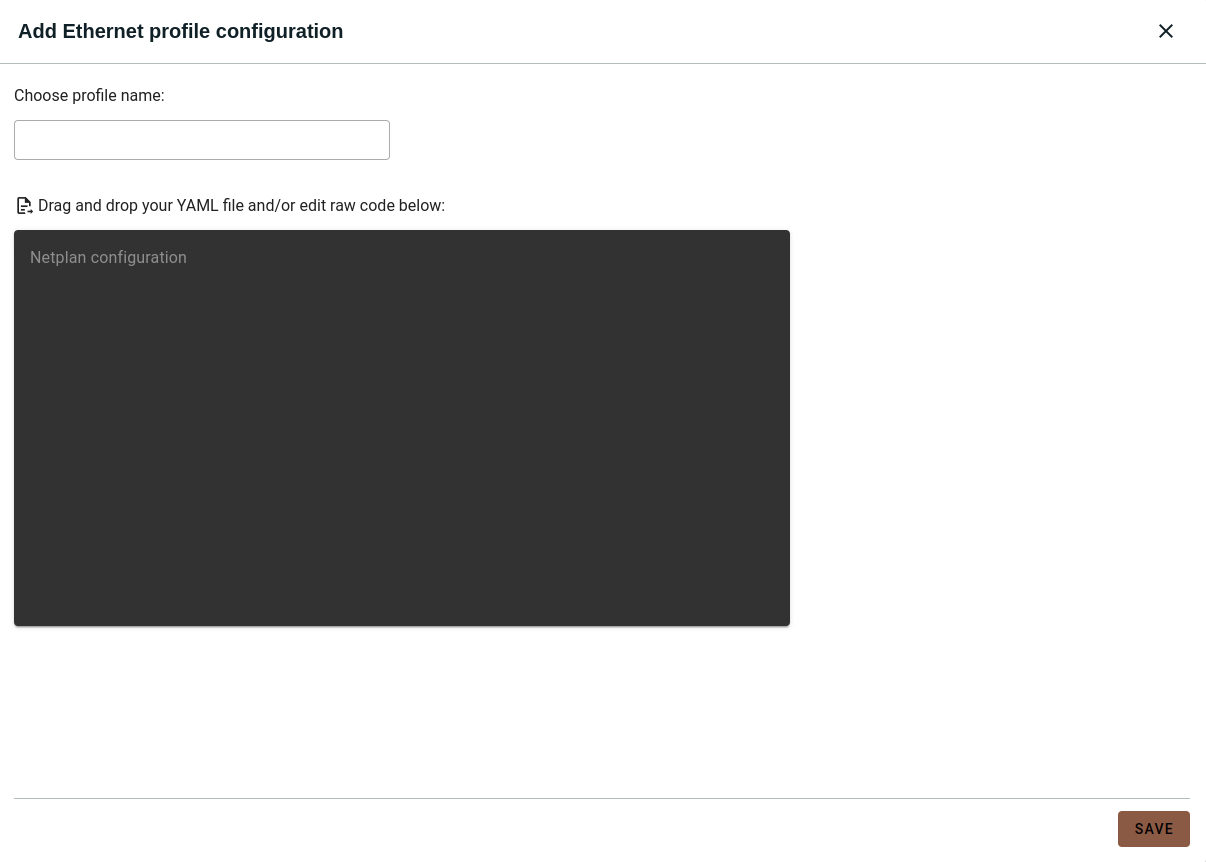
Insert configuration for a wired profile#
Click the close icon (top right corner) to exit the editor without saving changes.
Edit existing profile
You can edit the configuration of an existing profile (unavailable for default profiles). In case of WiFi the fields will be shown to be edited if the edit tools was Fill form or the YAML code will be shown to be edited in case the edit tool was Insert configuration or the profile is of wired type. After making changes click SAVE. Click the close icon (top right corner) to exit the editor without saving changes.
Create a new profile from an existing one
When selecting Copy and edit from the context menu of the profile, the editor is opened to create a new profile. The fields are already filled out from the selected profile. You can edit these fields to your liking and save as normally done creating new profiles.
View profile
Clicking on profile will open the editor with that configuration. The configuration will be shown in the same edit tool that was used for creating the profile. In case of WiFi profile, if it was created using the Fill form it will show the fields and in case of the Insert configuration the YAML block will be shown. For Wired profiles the YAML block is shown.
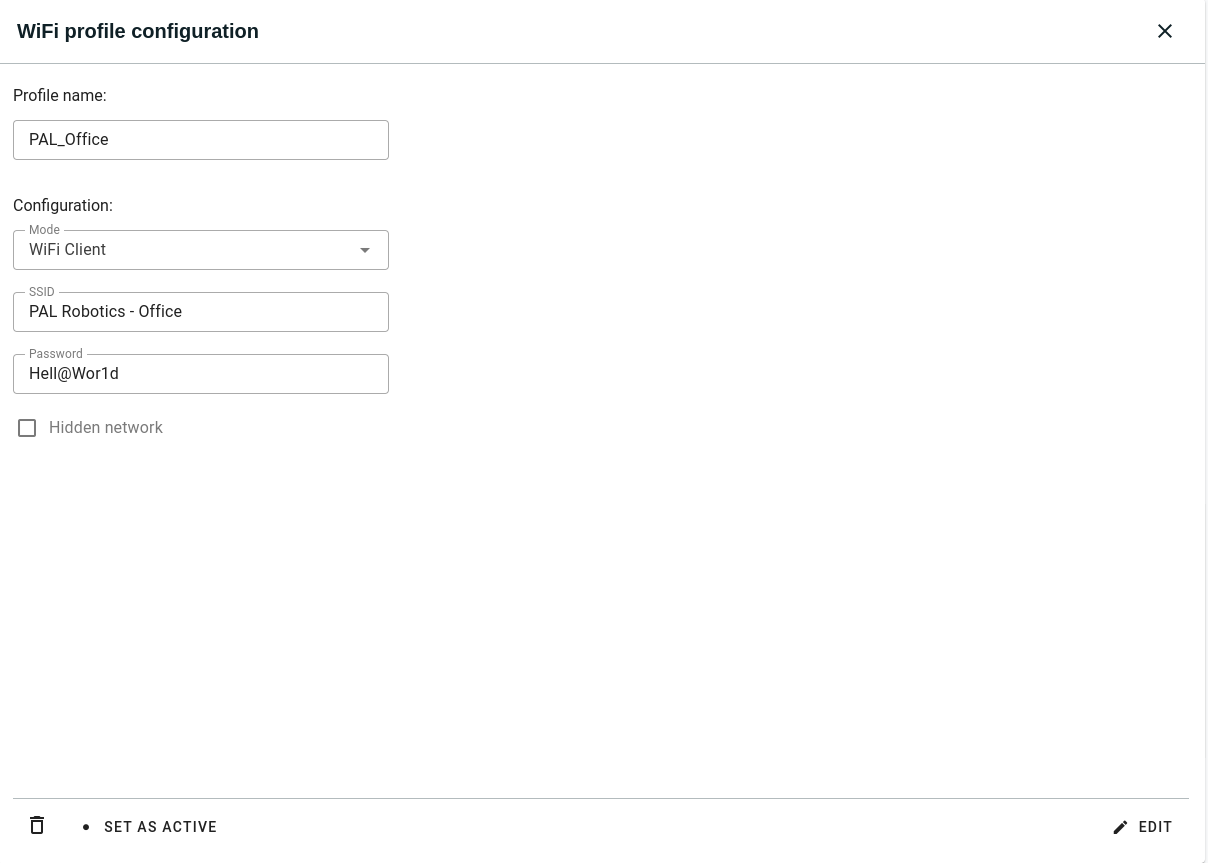
The editor will be in view mode, so no editing can be done. Click on the Edit button to switch to edit mode, and this way you can edit the YAML configuration or modify the filled fields. In the view mode there are also options for setting the profile as the active for the given group or deleting it, same as in the profile context menu.
In case of default profiles available on the robots, options to delete or edit them are disabled from the web interface.
Click the close icon (top right corner) to exit the editor.
There is pal network command that allows you to do some basic management of the network profiles. The command has the following verbs.
pal network show: Shows the current active network profiles.
$ pal network show
Active WiFi profile -> hotspot
Active Wired profile -> server
Pass the -v flag for more verbose output.
$ pal network show wifi -v
Active WiFi profile -> hotspot
File -> /etc/netplan/pal/50-wifi-hotspot.yaml
↓ Content ↓
# YAML content of netplan configuration
pal network list: Lists all available network profiles.
$ pal network list
WiFi profiles:
- hotspot
- my-wifi-profile
Wired profiles:
- server
- client
Pass wifi or wired as an argument to list only WiFi or Wired profiles.
pal network set: Sets a profile as active to change current network configuration.
If called by itself, it will prompt you to select the network type and then the profile.
$ pal network set
   1. wifi
   2. wired
Enter your choice as a number or unique substring (Control-C aborts): wired
   3. client
   4. server
Enter your choice as a number or unique substring (Control-C aborts): server

Setting server as active for wired network.
You can also pass the network type and the absolute profile path as arguments.
$ pal network set wifi --profile-path /etc/netplan/pal/50-wifi-client.yaml
Setting client as active for WiFi network.
Note
The profile based on how they are created are located in the following directories:
/etc/netplan/pal/ for default profiles that come with the robots.
/etc/netplan/use_profiles/editor/ for profiles created with the WebGUI using the fill form tool.
/etc/netplan/user_profiles/advanced/ for profile created with the WebGUI using the insert configuration tool.
pal network disable: Disables a given network group.
Pass wifi or wired as an argument to disable the type of network.
$ pal network disable wifi
Disabling wifi network.
Are you sure you want to disable the wifi network group? [y/n] y
Disabling wifi
pal network info: Shows the information about the network profile.
$ pal network info
1. wifi
2. wired
Enter your choice as a number or unique substring (Control-C aborts): 2
3. client
4. server
Enter your choice as a number or unique substring (Control-C aborts): 1

File -> /etc/netplan/pal/25-bridge-client.yaml
Contents for client ->
# both ethernet interfaces will act as clients under a bridge
network:
version: 2
renderer: NetworkManager
ethernets:
   eth0:
      dhcp4: no
   eth1:
      dhcp4: no
bridges:
   br0:
      dhcp4: yes
      interfaces:
      - eth0
      - eth1
Your robot’s network can be configured in three different ways:
A. Standalone
This setup is the simplest and is ideal for quick demos or mobile configurations.
In this mode, the robot functions as an Access Point. Any WiFi-enabled device
can connect to the robot by joining the robot-S/N network. Once connected,
devices will join the robot’s internal network.
All nodes of the robot will be accessible without any additional configuration steps.
This configuration is detailed in the Setting up Access Point mode section.
B. Standalone with Internet access
An enhancement of the previous mode setup is to have connectivity to the robot and Internet access. In this mode, the robot’s devices will be able to reach the Internet to perform updates and allow remote assistance.
You only need to configure the WiFi client as described in the Connecting to your LAN section.
C. VPN
In this mode, the robot integrates with your company’s or institution’s building infrastructure like any other network device will. This mode is described in the VPN network configuration page.
Setting up Access Point mode#
In order to configure PAL’s robots as access point open the Web user interface via the URL http://robot-0c/networking.
Here in the WiFi group you can select the default profile hotspot and set is as active, or create a new profile and using it as WiFi Access Point mode.
You should see the SSID of that active access point profile in your scanned networks and connect to it with the password.
Check out how to create or set as active a profile in General network configuration
The router always provides the Access Point feature because it contains two wireless interfaces. One is meant to act as an Access Point and the other as a WiFi client.
If the robot WiFi client was configured incorrectly, it is possible to recover access to the robot by using the Access Point feature.
The default Access Point credentials have been detailed previously in the table Access Point default configuration.
Access the Mikrotik router webfig as explained in the Overview section.
In the left column select Wireless and then the wifi_AP interface.

Here, inside the Configuration block edit the SSID.

Then in the Security block set the Passphrase, edit it to set a new password.
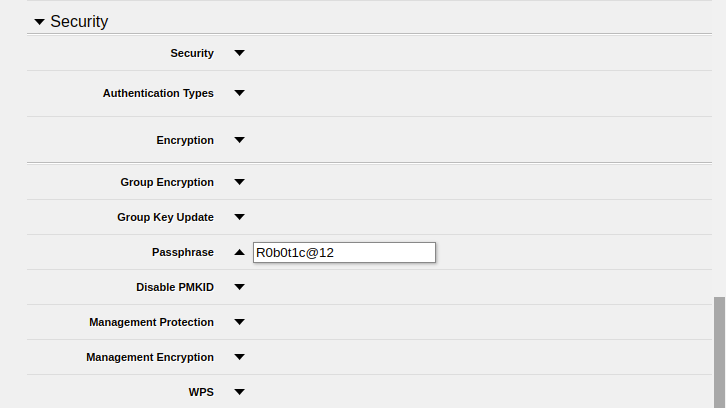
Finally, click on the Apply button to save the changes.
This is only the minimal configuration needed to set up the Access Point, you can explore and edit all the options available in the router to fine tune it for your needs.
In the left column of the Networking App you will see two wireless interfaces, one for Access Point configuration and the other for WiFi client.
Click on Access Point 2.4GHz, and the network editor will open on the right.
When the editor is opened, the fields are showing the current configuration of the network.
There are the following fields which you can edit and view:
SSID, name with which the network will be discoverable.
Password, with which you can connect the access point network. Click on the visibility icon
to view or hide the password inside the field.
Band, select the band frequency standard.
Click on save and you will be prompted to confirm saving the modifications.

Click on the close button in the upper right corner of the editor to exit without saving any changes.

Connecting to your LAN#
In order to connect to your own LAN follow the steps below.
First of all you need to access the Web user interface via the URL http://robot-0c/networking.
In the wired group create a new profile and fill it with the right configuration for your LAN. The profile should be set as active.
Check out the fields used for LAN management in the Netplan documentation.
Observe the instructions in this section if your WiFi network uses WPA-Personal. If your network uses WPA-Enterprise (also known as RADIUS) navigate to the WPA-Enterprise network configuration section.
Log in the router as detailed in the Overview section Access Point default configuration
Click onto the Wireless tab on the top left hand side and select wifi_CLIENT:

And configure your WiFi client interface.
The router embedded in the robot is very powerful, so any other WiFi option you might need is implemented.
In Configuration introduce your SSID

If necessary, in Channel, you can fine tune your WiFi 5GHz band, channel width and frequency as well as more advanced parameters if needed.
Finally, in Security, you can set the Passphrase if the network you are trying to connect is WPA2 or WPA3 personal, but any other possible encryption mechanism is supported.
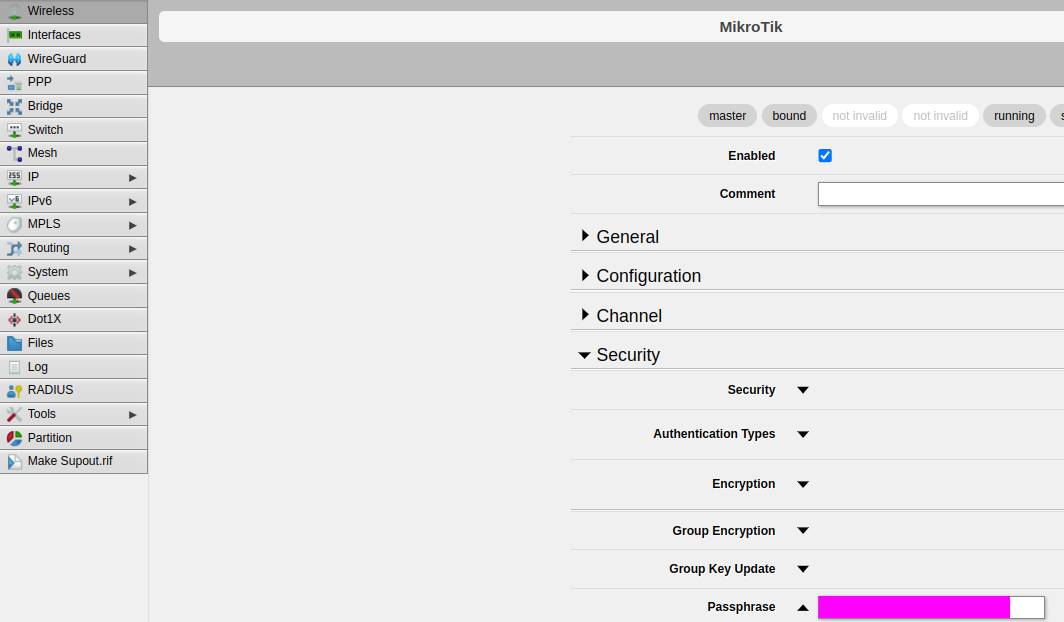
Use the WebGUI Networking app to connect the robot to your LAN network using the WiFi client interface.
In the left column of the Networking app click on WiFi Client 5Ghz, to open the editor.
Here you can modify the:
SSID, enter the name of your WiFi network.
Password, enter the password for your WiFi network.
Click on the SAVE button and confirm to apply changes.
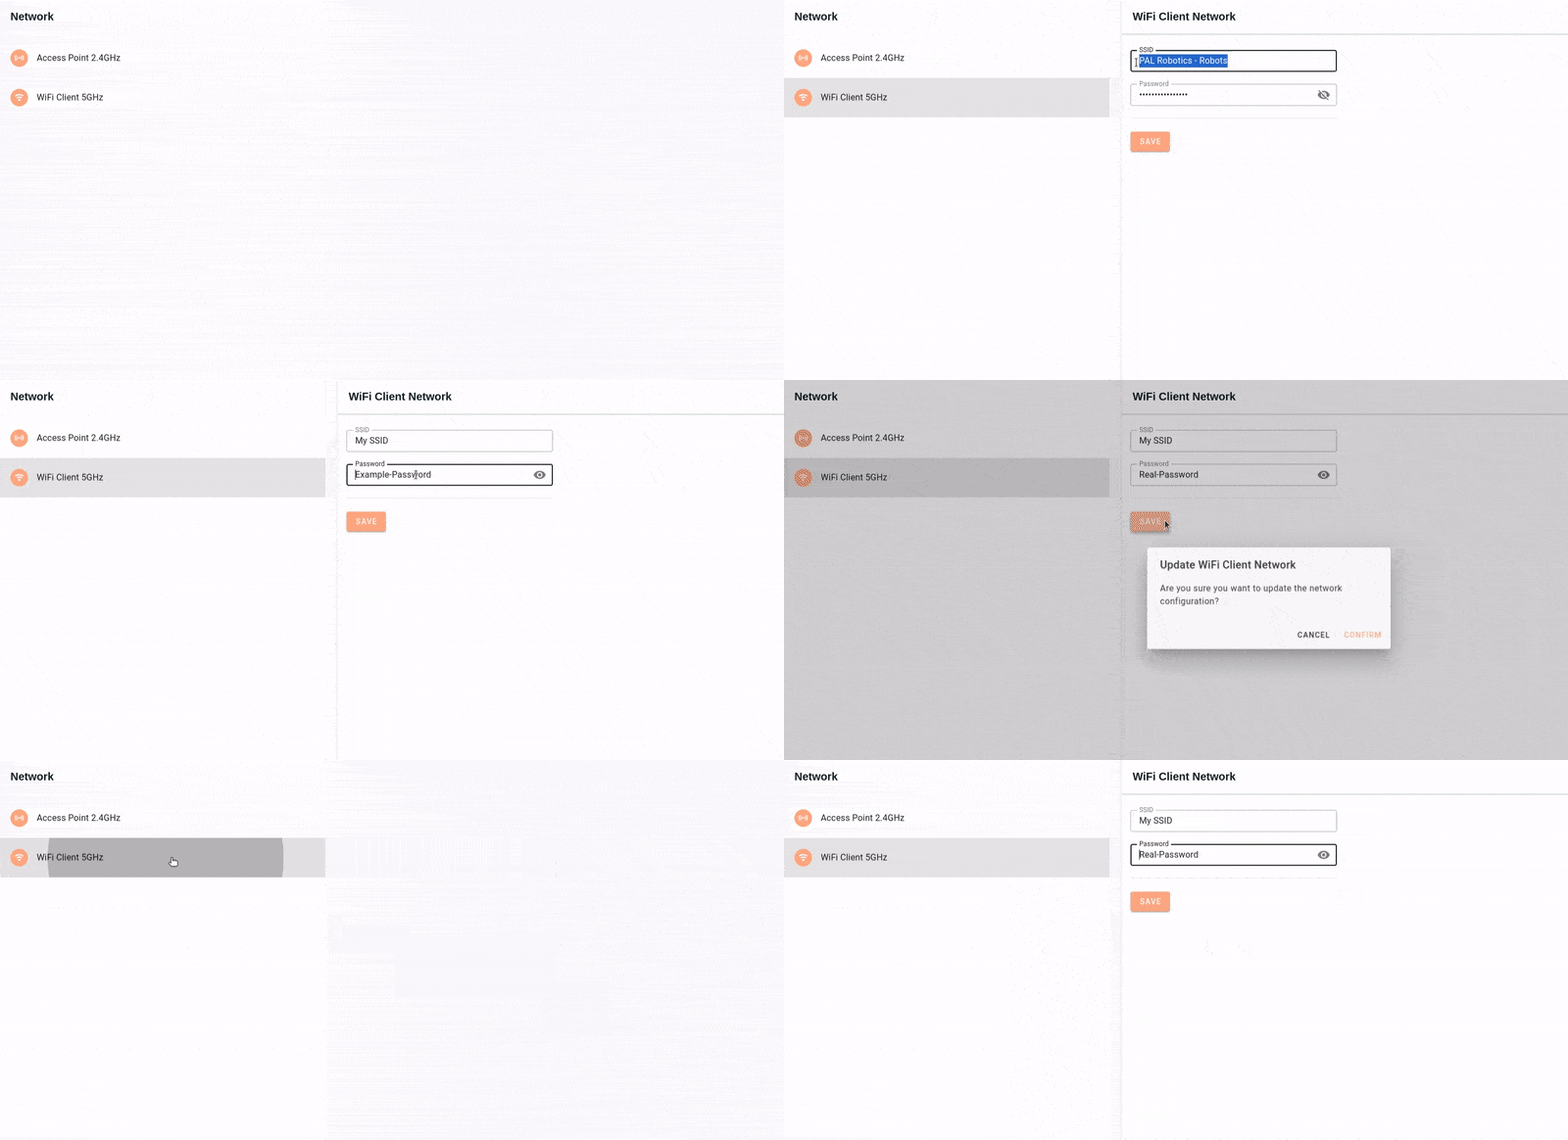
Click on the close button in the upper right corner of the editor to exit without saving any changes.