How-to: Set up your developer environment
In this page we provide some tips to set up your developer environment. We recommend developing from a docker container, as explained in the Developing with the PAL Developer Docker image page.
Step 1: Set your Docker image (optional)
We recommend developing from the development docker image, rather than the public docker image. You can find the detailed instructions to to use docker in the Developing with the PAL Developer Docker image page.
As explained in that page, do not forget to create a folder in $HOME/exchange. This folder will be mounted in
the docker container, and will be the place where you can share files between your host and the docker
container. Therefore, we advise using this folder to place your ROS workspace, and any other files you may need.
It is also recommended to store any other data you may generate from the docker container in this folder,
this way no information will be lost if you remove the docker container, e.g., to update the image. If you
don’t need to update the image, it is recommended not to remove the docker container, specially if you manually
install other software (e.g. python packages via pip, or debian packages via apt).
Step 2: Customize your bashrc
Make sure to source the ROS environment and PAL OS in your ~/.bashrc (e.g., source /opt/ros/humble/setup.bash
and source /opt/pal/alum/setup.bash). This way, you won’t need to source it every time you open a new terminal.
If you plan to use the container to test software locally on you machine and do not deploy it to the robot, you can also source your workspace. However, if you plan to deploy the code to the robot, it is recommended not to do it, as the deploy tool will complain if a workspace is sourced. You can source your local workspace in the terminal each time you need to test software locally.
You can also add any other customizations you may need, e.g., aliases to deploy the code to the robot (e.g.,
alias deploy="ros2 run pal_deploy deploy", as explained in the Deploying ROS 2 packages on your robot page).
If you plan to test things locally in your PC, it is also recommended to add the ROS domain ID to your bashrc, and make sure that no one else in your network is using the same domain ID. By setting a specific default domain ID in your bashrc, you prevent streaming data from the robot to your PC and vice versa, in case you forget to set the domain ID in the terminal. You can find more information on how to set the domain ID in the Set up the ROS_DOMAIN_ID in ROS 2 page.
alias deploy="ros2 run pal_deploy deploy"` # useful alias to deploy code to the robot

source /opt/ros/humble/setup.bash
source /opt/pal/alum/setup.bash

source /path/to/your/workspace/install/setup.bash # only if you don't plan to deploy software to the robot, only test locally

export ROS_DOMAIN_ID=2 # if you plan to test things locally in your PC, set a default domain ID different from the robot's and other users in the network
Step 3: Get started with simulation
If you still have not done so, get started with the simulation of you robot as detailed in the Simulation page.
Step 4: Check you can visualize topics from the robot
Whenever you need to connect to the robot, either to run some nodes on your PC or to inspect some ROS information from the robot, you first need to make sure that you are in the same network as the robot. If it is not the case, connect to that network and restart your docker container.
Then, set your domain ID to be the same as the robot, as explained in the Set up the ROS_DOMAIN_ID in ROS 2 page, and make sure you
can visualize the topics from the robot (e.g., ros2 topic list).
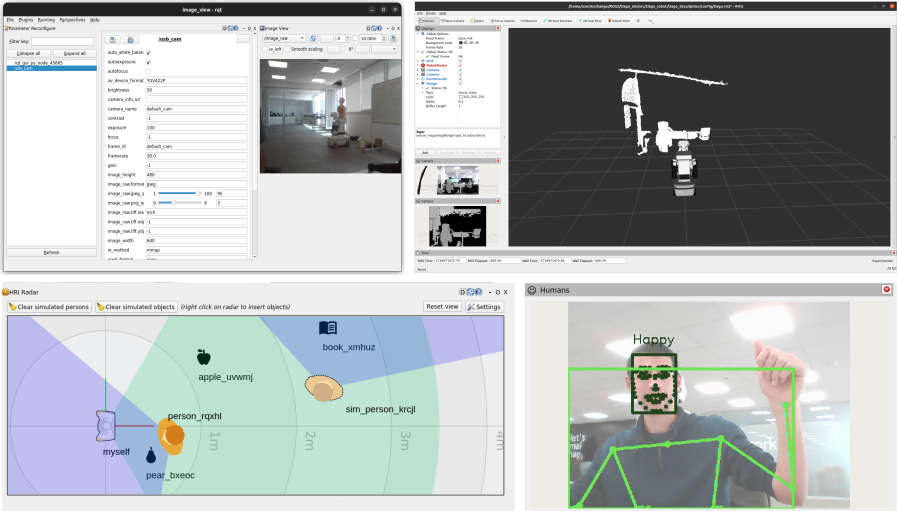
You can make use of the standard ROS2 tools visual interfaces, such as ROS’s RQt or ROS’s RViz to visually inspect the data from the robot. You can also use the custom tools that we provide to visualize human related data, as detailed in Tooling and debugging of human-robot interactions.
Step 5: Tips to work with Visual Studio Code (optional)
If you use Visual Studio Code as your IDE, we recommend the following extensions:
Remote Explorer: You can use it to start and open containers, browse and edit the files in them, and run commands in the terminal. It is recommended to run the container the first time from the command line, as explained in the Developing with the PAL Developer Docker image page, and then use this tool to open the container in Visual Studio Code.
Remote - SSH: You can use Visual Studio Code to connect to the robot via SSH.
Other extensions the help you editing and formatting code that you can install inside the container, such as Python, C++ Extension Pack, etc.