A first User Interface (UI) for your robot application
🏁 Goal of this tutorial
By the end of this tutorial, you will know how to create a user interface for your robot application, how to display it on the robot’s display, and how to connect the user interface to the robot’s main control script.
Pre-requisites
Note
As of PAL OS edge, this tutorial requires some familiarity with the command-line, and basic experience with running Docker.
You need to have your Docker developer environment set up and running. You can also use the PAL public Docker image.
This tutorial uses Automatic code generation with rpk. You might want to check this page first, even though we will cover
rpkbasic usage here as well.
What are we building?
Creating a UI with a rpk template
Step 1: generating the task skeleton
start your Docker container:
xhost + # this allows your Docker container to access your host X server
mkdir -p ~/exchange # this is a shared folder between your host and the container

docker run -it --rm --name pal_docker \
           --device /dev/video0:/dev/video0 \
           -e DISPLAY=$DISPLAY \
           -v /tmp/.X11-unix:/tmp/.X11-unix \
           -u user:user \
           -v ~/exchange:/home/user/exchange \
           <robot-type>-<serial>-dev:alum-<release> bash
Replace <robot-type> and <serial> with the type and serial
number of your robot(eg tiago-123), and <release> with the PAL
OS version you are using (e.g., 25.01).
Once inside the container, source your ROS 2 environment:
source /opt/pal/alum/setup.bash
xhost + # this allows your Docker container to access your host X server
mkdir -p ~/exchange # this is a shared folder between your host and the container

docker run -it --rm --name pal_docker \
           --device /dev/video0:/dev/video0 \
           -e DISPLAY=$DISPLAY \
           -v /tmp/.X11-unix:/tmp/.X11-unix \
           -u user:user \
           -v ~/exchange:/home/user/exchange \
           palrobotics/public-tutorials-alum-devel bash
Once inside the container, source your ROS 2 environment:
source /opt/pal/alum/setup.bash
go to your
exchangefolder and create a new workspace:
cd ~/exchange
mkdir ws
cd ws
run
rpkto create the task with a sample GUI:
$ rpk create -p src/ task
ID of your application? (must be a valid ROS identifier without spaces or hyphens. eg 'robot_receptionist')
> gui_task

Full name of your skill/application? (eg 'The Receptionist Robot' or 'Database connector', press Return to use the ID. You can change it later)
> <leave empty to re-use the ID>

Choose a template:
1: base task template [python]
2: simple task template with a graphical user interface [python]
3: 'greet' task mock-up [python]


Your choice?
> 2

What robot are you targeting?
1: Generic robot (generic)
2: Generic PAL robot/simulator (generic-pal)
3: PAL ARI (ari)
4: PAL TIAGo (tiago)
5: PAL TIAGo Pro (tiago-pro)
6: PAL TIAGo Head (tiago-head)

Your choice? (default: 1: generic)
> 2
Choose the simple_ui template (option 2), and the generic-pal
robot (option 2).
The tool will then create a simple yet complete ROS 2 task, with a graphical interface we can use as a starting point.
Note
You can also pass all the rpk parameter directly from the command-line:
rpk create -p src/ --robot generic-pal task -y --id gui_task --template simple_ui
Check rpk --help for more information on the available parameters.
build and source the workspace:
colcon build
Step 2: running the task
To run the task and display the user interface, you need to: 1. start the UI server, which will display the user interface; 2. start the task node. The task, however, will not run unless instructed to 3. call the task’s control server, to effectively start the task.
To do so, we need three terminals, each connected to the Docker container.
Note
Every time you need to connect to your Docker container from a different terminal, run the same two commands:
docker exec -it pal_docker bash
source /opt/pal/alum/setup.bash
open a new terminal, connect to your Docker container, and start the UI server.
In a new terminal:
docker exec -it pal_docker bash
source /opt/pal/alum/setup.bash
ros2 run ui_server ui_server
The UI server window should open:
start the task. In the same terminal as the one use to compile your task, launch the node:
source install/setup.bash
ros2 launch gui_task gui_task.launch.py
Nothing is displayed yet, as the task is currently ‘sleeping’: waiting to be explicitely started.
You should however see something similar to this in the terminal, indicating that the task is correctly started:
[INFO] [gui_task]: Initialising...
[INFO] [gui_task]: Task gui_task started, but not yet configured.
[INFO] [gui_task]: Task gui_task is configured, but not yet active
[INFO] [gui_task]: Listening for UI messages on topic </gui_task/ui_msg>
[INFO] [gui_task]: Task gui_task is active and running
run the task. In a third terminal, run:
docker exec -it pal_docker bash
source /opt/pal/alum/setup.bash
source ~/exchange/install/setup.bash # needed for the 'task_msgs' package

ros2 action send_goal /gui_task/control task_msgs/action/TaskControl "task_data: ''"
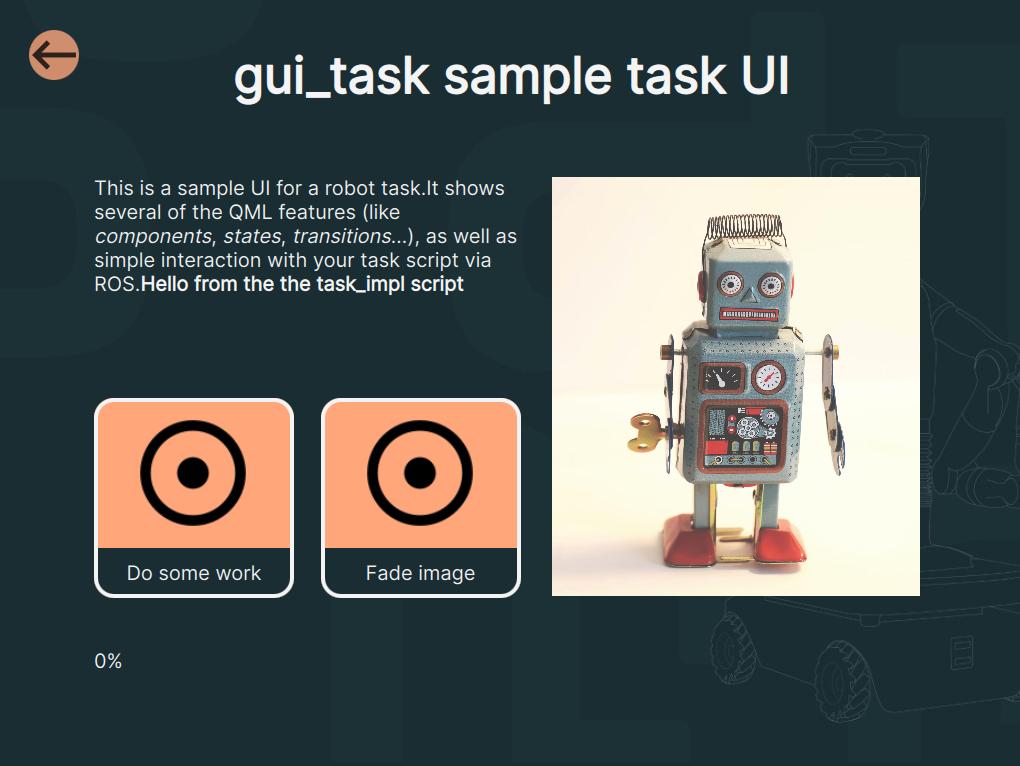
You should now see the user interface of the task:
Important
You might have noticed that the ros2 action call did not return:
this is expected! while the task is not complete, the action remains active,
and the terminal is waiting for the task to finish.
Interacting with the task
Try to press the Do some work button a few times in the user interface. You will see the progress bar going up:
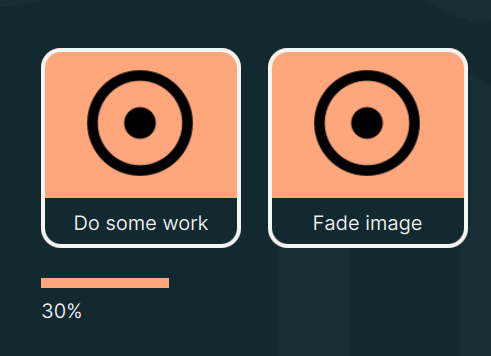
If you look at the terminal where the task is running, you will see the following messages:
[INFO] [gui_task]: Received UI message: button pressed 1 times. Increasing task completion by 10%
[INFO] [gui_task]: Completed 10% of the task
[INFO] [gui_task]: Received UI message: button pressed 2 times. Increasing task completion by 10%
[INFO] [gui_task]: Completed 20% of the task
[INFO] [gui_task]: Received UI message: button pressed 3 times. Increasing task completion by 10%
[INFO] [gui_task]: Completed 30% of the task
In reality, the task script is interacting with the user interface in a bi-directional way:
The initial visuals are set by calling the /ui/set_fragment service (exposed by the robot’s ui_server), and passing a QML fragment.
Note
QML is a declarative language used to create user interfaces, and is the language used by the ui_server to display the user interface on the robot’s screen.
The task script then starts listening to the /gui_task/ui_msg topic, which is
the topic where the user interface sends messages to the task script.
Every time the user clicks on the button, the user interface sends a message on this topic:
gui_task/res/ui/TaskUI.qml¶ 1import QtQuick 2.15
2import Ros 2.0
3
4Item {
5 // [...]
6
7 StringTopic {
8 id: stringTopic
9 isSubscriber: false
10 isPublisher: true
11 topic: "/gui_task/ui_msg"
12 }
13
14 // [...]
15
16 MainScreen {
17 id: mainScreen
18 property int counter: 0
19
20 // [...]
21
22 // btnAction1 is defined in MainScreen.ui.qml
23 btnAction1.onClicked: {
24 counter += 1;
25 stringTopic.value = "button pressed " + counter + " times";
26 stringTopic.publish();
27 }
28 }
29}
The task script then receives this message, and updates the task progress by publishing
a message on the /gui_task/task_progress topic:
gui_task/gui_task/task_impl.py¶ 1# [...]
2
3 class TaskImpl(Node):
4 def __init__(self) -> None:
5 super().__init__('task_gui_task')
6 # [...]
7 self.completed = 0
8 self._ui_msg_sub = None
9 self._task_progress_pub = None
10
11 # [...]
12
13 def on_ui_msg(self, msg: String) -> None:
14 self.get_logger().info(f"Received UI message: {msg.data}. "
15 "Increasing task completion by 10%")
16 self.completed += 10
17 self._task_progress_pub.publish(Int16(data=self.completed))
18
19 def on_activate(self, state: State) -> TransitionCallbackReturn:
20 # [...]
21 self._ui_msg_sub = self.create_subscription(String,
22 '/gui_task/ui_msg',
23 self.on_ui_msg,
24 10)
25
26 self._task_progress_pub = self.create_publisher(Int16,
27 '/gui_task/task_progress',
28 10)
29 # [...]
30 return super().on_activate(state)
31
32 # [...]
Finally, the UI listen to the /gui_task/task_progress topic, and updates the
progress bar accordingly:
gui_task/res/ui/TaskUI.qml¶ 1import QtQuick 2.15
2import Ros 2.0
3
4Item {
5 // [...]
6
7 StringTopic {
8 id: stringTopic
9 isSubscriber: false
10 isPublisher: true
11 topic: "/gui_task/ui_msg"
12 }
13
14 IntTopic {
15 id: taskProgressTopic
16 value: 0
17 isSubscriber: true
18 isPublisher: false
19 topic: "/gui_task/task_progress"
20 }
21
22 // [...]
23
24 MainScreen {
25 id: mainScreen
26 property int counter: 0
27
28 taskProgress: taskProgressTopic.value
29
30 // [...]
31
32 // btnAction1 is defined in MainScreen.ui.qml
33 btnAction1.onClicked: {
34 counter += 1;
35 stringTopic.value = "button pressed " + counter + " times";
36 stringTopic.publish();
37 }
38 }
39}
The visuals are actually updated in the implementation of the MainScreen
QML component, in MainScreen.ui.qml:
gui_task/res/ui/MainScreen.ui.qml¶ 1 import QtQuick 2.15
2 import "js/Constants.js" as Constants
3
4 Rectangle {
5 id: mainScreen
6 // [...]
7 // this property is updated from TaskUI.qml when a msg is received
8 // on /gui_task/task_progress
9 property int taskProgress: 0
10
11 // aliasing the button so that it can be accessed from the parent component
12 // (TaskUI.qml in this case)
13 property alias btnAction1: btnAction1
14
15 // [...]
16 IconButton {
17 id: btnAction1
18 x: 95
19 y: 398
20 label: "Do some work"
21 }
22 // [...]
23 Rectangle {
24 id: taskProgressBar
25 x: desc.x
26 anchors.top: btnAction1.bottom
27 anchors.topMargin: 30
28 width: desc.width * (mainScreen.taskProgress/100)
29 height: 10
30 color: Constants.accentColor
31 }
32
33 Text {
34 id: taskProgressLabel
35 anchors.left: taskProgressBar.left
36 anchors.top: taskProgressBar.bottom
37 anchors.topMargin: 10
38 text: mainScreen.taskProgress + "%"
39 font: Constants.font
40 color: Constants.fgColor
41 }
42
43 // [...]
44 }
Summary
In this tutorial, you have learned how to create a simple user interface
for your robot application, using the rpk tool to generate a task skeleton
with a graphical user interface, and how to run it from a Docker image.
You have also learned how to interact with the user interface, and how to connect it to your task script, so that the user interface can send messages to the task script, and the task script can update the user interface.
In this tutorial, bi-directional communication between the UI and the main script is achieved using ROS topics. Other mechanisms are available (using ROS actions, services or parameters, or using /ui/update_state): you can combine them to best fit your needs, as we might see in follow-up tutorials.
Next steps
Modify the user interfaces
The user interface is written in QML. You can edit it either with Qt Design Studio, or by directly editing the QML files in a text editor.
You can modify the user interface by editing the QML files in the
gui_task/res/ui/ folder. The main file is TaskUI.qml, which contains the
Install on the robot
You can also deploy this sanple task on your robot, and run it directly from the robot’s touchscreen. Check the Deploying ROS 2 packages on your robot page.