Teleoperation with VR headsets
Attention
This page documents a Premium robot feature. It may or may not be available on your robot.
🏁 Goal of this guide
This page is a step by step guide on how to use the PAL VR Teleoperation stack, that allows you to teleoperate Tiago Pro using the handles of a Meta Quest 3 VR headset. You will learn how to start the application and perform safe teleoperation.
Pre-requisites
You should first have completed 🏁 Getting started
A configured Meta Quest 3 VR headset connected to your network.
Warning
It is recommended to first test the teleoperation in simulation environment before proceeding with the real robot to get yourself familiarized with the reactivity of the teleoperation.
Running VR teleoperation in simulation
In this section, you will learn how to launch the required nodes for VR teleoperation, allowing you to control the robot within the Gazebo simulation environment.
Step 1 : Start the robot simulation
During all this process, Gazebo is expected to be running. You can start it with:
ros2 launch tiago_pro_[your_serial_number]_gazebo tiago_pro_gazebo.launch.py
Step 2 : Start the teleoperation backend
The teleoperation backend manages user commands coming from the headset, such as arm movements and gripper actions, translating them into appropriate instructions for the VR ROS 2 controller running in the robot.
Open a new terminal inside your docker and start it with:
ros2 run vr_teleop_backend both_arms_teleop --base base_footprint
It receives only one argument, the base link to be used as references for the teleoperation
positions. In most of the cases, it should be base_footprint
Do not close this terminal.
Step 3 : Start the teleoperation frontend
The teleoperation frontend is in charge of providing the interface between the headset and ROS 2. It serves a web page that you will need to open in your headset browser.
For the moment, let’s just start it, we will connect later. Open a new terminal in the docker and execute:
ros2 launch vr_teleop_frontend start_frontend.launch.py
The Teleoperation Web Interface is now available, and you can connect to it from your headset. Before proceeding, determine the IP address of the PC running the frontend, as you will need it to connect in the following steps. You can get the IP with:
ip a
Please ensure the IP you write down can be pinged from other devices in the same network.
Do not close this terminal.
Step 4 : Start the VR Whole Body Controller (WBC)
A dedicated controller is provided for VR teleoperation. This controller performs inverse kinematics to move the entire robot body, including the torso, toward the target pose, while continuously avoiding self-collisions.
This controller needs to be launched manually with the following command:
ros2 launch tiago_pro_vr_wbc_cfg tiago_pro_vr_teleop_controller.launch.py
Do not close this terminal. For safety, the controller will unload when closing it.
Step 5 : Activate the VR Whole Body Controller
After launching the controller, you must activate it to enable whole-body control of the robot via the WBC. Ensure that any other controllers are deactivated before proceeding.
This can be done with the following command:
ros2 control switch_controllers --deactivate arm_right_controller arm_left_controller torso_controller head_controller \
--activate vr_teleop_controller --strict
The robot is now ready to accept teleoperation references. Please read carefully the following steps.
Step 6 : Open the Teleop Web Interface in the headset browser
After starting the teleoperation frontend, the Web Teleoperation Interface becomes accessible.
Open this special webpage in your headset’s browser. Using WebXR API, it will collect data from the headset’s APIs and transmit it to the backend for processing. The interface is available under the following IP:
https://<ip_recovered_in_step_2>:4443.
Now it’s the moment to put on your headset. Adjust the straps to be comfortable and go in the headset browser. Enter the previous link in the browser. You might get a warning like this:

Figure: Safety warning
This warning appears because the Web Teleoperation Interface uses a self-signed HTTPS certificate, which your browser cannot verify. It is safe to proceed—simply accept the warning to continue to the interface.
If everything went well, you should see something like:
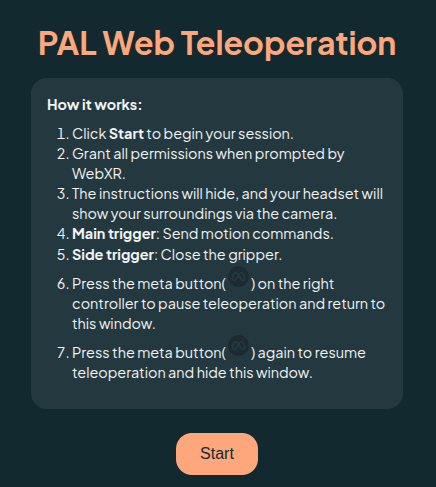
Figure: Web Interface
Step 6 : Before you start
Attention
Before pressing the start button, carefully read the instructions that appear on the web.
To send a command to the robot, you will need to press and hold the main trigger on the VR controller. The robot will only follow your hand movements while the trigger is pressed (dead man’s switch).
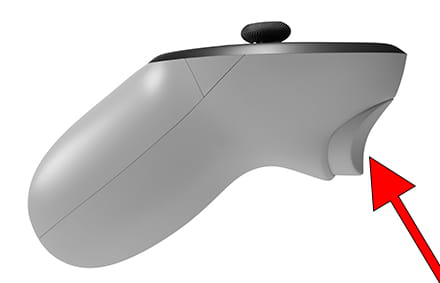
Figure: Location of the main trigger in a controller.
Releasing the trigger will stop the robot from moving, allowing you to safely reposition your hands or adjust your stance.
When you press the start button, the instructions screen will disappear and you will see your surroundings through the headset camera. At this point, you may start teleoperating. Please read the next section to understand how to do it safely.
In addition to the dead man’s switch, you can stop teleoperation completely at any time by pressing the
Meta button  on the right-hand controller:
This will bring back the instructions screen.
on the right-hand controller:
This will bring back the instructions screen.
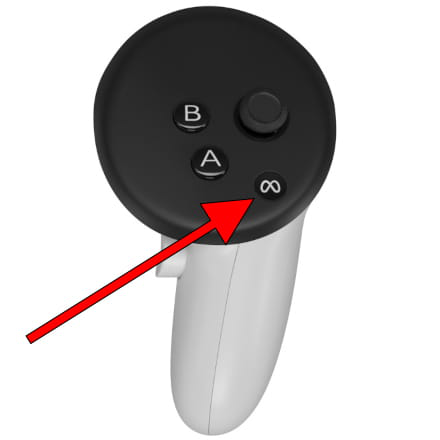
Figure: Location of the meta button in the right hand controller.
Warning
Whenever you are not actively teleoperating, ensure that the instructions screen is visible. This guarantees that no commands are sent to the robot and allows you to move the controllers freely (for example, to hand them to another person).
Step 8 : Teleoperate!
You are now ready to begin teleoperation. Start by controlling only one arm to familiarize yourself with the system. To do this, press and hold the main trigger (located under your index finger) on the VR controller, then move your hand slowly. The robot should closely follow your hand movements in the simulator. Experiment with different positions and orientations. At any time, you can release the trigger to stop the robot’s movement; the arm will remain in its last position. You can then reposition your hand as needed for more comfortable operation. This allows you to achieve a wide range of arm movements with minimal hand motion.
You can also try teleoperating both arms simultaneously to explore the system’s responsiveness. Since you are operating in simulation, you may experiment with moving the arms close together or even attempting collisions. The controller is designed to prevent self-collisions, so the robot will automatically avoid unsafe configurations while trying to mimic your commands as closely as possible.
You can control the robot gripper by using the side triggers (located under your middle finger). The gripper will open or close proportionally to how much you press the trigger, fully closing when the trigger is pressed all the way.
Running VR teleoperation with the real robot
After you have familiarized yourself with the behavior of the teleoperation stack in simulation and are able to perform complex motions with both arms simultaneously, you may proceed to operate the real robot.
The teleoperation procedure is exactly the same, but the process to start all the nodes differs slightly.
Important
You should have the emergency button close to you at all times.
Step 1 : Start the teleoperation modules
Access the robot’s WebGUI. In the side panel, locate and click on the Modules section to view the available modules on your robot.
Locate the three modules that begin with vr: vr_teleop_backend, vr_teleop_frontend, and
vr_teleop_controller. Start each module individually. If you encounter any issues, you can
view detailed logs by clicking the corresponding log button.
Step 2 : Move the robot to home position
The teleoperation must always start from the home position of the robot. In order to do that, you can either press the home button in the WebGUI or ssh into the robot and execute:
ros2 run play_motion2 run_motion home
Step 3 : Start the VR robot controller
As in simulation, the VR controller manages teleoperation references. SSH into the robot and activate it with the following command:
 ros2 control switch_controllers --deactivate arm_right_controller arm_left_controller torso_controller head_controller \
--activate vr_teleop_controller --strict
To return to normal operation, deactivate the VR controller and reactivate the standard controllers:
ros2 control switch_controllers --deactivate arm_right_controller arm_left_controller torso_controller head_controller \
--activate vr_teleop_controller --strict
Warning
Once the VR controller is enabled, the robot can only be moved via teleoperation. You will not be able to execute predefined motions or move the arms manually. Switch back to normal operation if needed.
Warning
After enabling the VR controller, the robot is ready to receive teleoperation commands. Until you start the teleoperation in the web and press one of the main triggers, the robot won’t move. However, please be extremely careful while starting: ensure that you are not pressing any buttons in the controller and that you are at a safe distance from the robot.
Step 4 : Connect the headset to the robot hotspot
In the simulation setup, the headset was connected to the same network as the simulation PC. For real robot operation, however, you must connect the headset directly to the robot’s Wi-Fi hotspot to ensure a reliable and low-latency connection.
To do this, follow these steps:
- Obtain the Robot Hotspot Credentials:
Access the robot’s WebGUI from your browser. Navigate to the Networking tab, where you will find the Wi-Fi network SSID and password for the robot’s hotspot.
- Connect the Headset to the Robot Hotspot:
On your VR headset, open the Wi-Fi settings and select the robot’s Wi-Fi network. Enter the password as displayed in the WebGUI.
Note
You may receive a warning indicating that the Wi-Fi network does not provide internet access. This is expected—proceed to connect anyway.
- Verify the Connection:
Ensure that the headset is successfully connected to the robot’s Wi-Fi. This connection is essential for the headset to communicate with the teleoperation frontend running on the robot.
Once connected, you can proceed to access the Teleoperation Web Interface from your headset browser, as described in the next steps.
Step 4 : Open the Teleoperation Web Interface
In your headset browser, go to https://10.68.0.1:4443/. You will see again the
teleoperation start page.
Step 5 : Start the teleoperation
Before pressing the start button, carefully review the instructions on the interface, just as you did in simulation. Ensure you understand how to initiate and stop teleoperation, and always keep the emergency button within reach.
The teleoperation procedure is identical to the simulation: use the main trigger to control the arms and the side triggers for the grippers. Release the trigger to stop the robot’s movement at any time. Always operate slowly and cautiously. If you see any sudden motions don’t hesitate to press the emergency button.
Remember, you can stop the simulation at any given moment by pressing the Meta Quest button
on the right controller.
Remember, you do not need to make large physical movements to teleoperate the robot. By pressing and releasing the main triggers, you can control the robot’s arms with minimal hand motion in a differential fashion. This approach enhances safety and comfort, reducing the risk of sudden or unintended movements and helping to prevent user fatigue or dizziness.
Step 6 : Happy teleoperation!
Congratulations! You have now completed the setup and operation of VR teleoperation for your Tiago Pro robot. By following this guide, you have learned how to safely control the robot both in simulation and with the real hardware using a Meta Quest 3 headset.
Always prioritize safety when teleoperating, especially with the real robot. Make sure to keep the emergency stop button within reach and operate the robot in a controlled environment.
For further information, troubleshooting, or advanced configuration, contact PAL Robotics support.