Create an application with rpk
rpk is a command-line utility to quickly generate missions, tasks or skills, ready for
customization and deployment on your robot.
To run rpk, you can use your development environment, as well as
PAL dockers, see Developing with the PAL Developer Docker image to see both customer and public
PAL OS Docker image available.
Pre-requisite
You should first have completed Automatic code generation with rpk.
This tutorial requires access to a real robot, or alternatively the PAL Interaction simulator.
Create an application skeleton
Create a new application skeleton on your ROS workspace - create a new workspace if needed.
mkdir ~/ws
cd ws
mkdir src && cd src
rpk create mission
Follow the instructions on screen. You will be asked to introduce:
ID: An ID for your new app. Must be a valid ROS identifier without spaces or hyphens. For instace,
llm_app.App name: Full name of your application. For instance,
My First App.Template type: choose the template for your application. For details refer to Automatic code generation with rpk. As in this tutorial we want to use LLMs for interaction, let’s choose number 5.
Choose a template:
1: base robot supervisor [python]
2: robot supervisor with pre-filled intent handlers [python]
3: robot supervisor with a GUI and pre-filled intent handlers [python]
4: complete supervisor example, using a basic chatbot to manage interactions with users [python]
5: complete supervisor example, using LLMs to manage interactions with users [python]
Robot type: The target robot your application will be deployed on. If you are using the simulator, you should select 2: Generic PAL robot/simulator.
What robot are you targeting?
1: Generic robot (generic)
2: Generic PAL robot/simulator (generic-pal)
3: PAL ARI (ari)
4: PAL TIAGo (tiago)
5: PAL TIAGo Pro (tiago-pro)
6: PAL TIAGo Head (tiago-head)
The script generates the following file structure, that is based on 📝 Developing robot apps
Configure the chatbot
First, configure the llm_bridge by editing the llm_bridge/config/00-defaults.yml file:
 1 /llm_bridge:
 2   ros__parameters:
 3      server_url: 'http://localhost:11434'  # URL of the LLM server (e.g., Ollama or OpenAI API)
 4      model: llama3.2:1b  # Model name or family
 5      api_key: ""  # Required for cloud services; leave empty for local services like Ollama
 6      system_prompt: |
 7          You are a friendly robot. You try to help the user to the best of your abilities. You are
 8          always helpful, and ask further questions if the desires of the user are unclear. Your
 9          answers are always polite yet concise and to the point.
10
11          Your aim is to recognize which action should be taken next and send it to the robot action
12          controller. Actions are described in JSON format, here is the list of available actions:
13
14          $action_list
15
16          Here is a description of the environment:
17
18          $environment
19
20          The user_id of the person you are talking to is $person_id. Always use this ID when referring
21          to the person in your responses.
22
23          Respond with a JSON object containing two fields, "suggested_response_to_user" and "next_action".
24
25          Examples:
26          - If the user says "Hello robot," respond: {suggested_response_to_user: "Hello",
27            next_action: {type: GREET}}
28          - If the user says "Take a fruit," respond: {next_action: {type: PICK_OBJECT, object: apple1}}
29
30          If you are unsure of the user’s intention, return an empty action and ask for confirmation.
Select and configure the LLM type: Ollama or OpenAI e.g. ChatGPT.
Ollama
Install Ollama:
pip install ollama
Download and extract the server:
curl -fsSL https://ollama.com/install.sh | sh
Alternatively, download and extract the ZIP file.
wget https://ollama.com/download/ollama-linux-amd64.tgz

sudo tar -C /usr -xzf ollama-linux-amd64.tgz
Run the server
ollama serve
Run a model:
ollama run llama3.2:1b
Note
You can choose whichever Ollama model you prefer from Ollama’s library, as long as your machine has the required compute resources to support the model you select.
You can now type directly to the chatbot to test if it is working!
Edit the configuration file above.
3  server_url: 'http://localhost:11434'
4  model: llama3.2:1b
Note
For Ollama, the model name (e.g., llama3.2:1b) must match the one being executed.
If you wish, you can also run Ollama on a different machine. Just ensure that you
provide the correct server URL in the configuration file.
OpenAI
If you are using ChatGPT, simply update the server URL model and API key.
3 server_url: 'https://api.openai.com'
4 model: 'gpt-4o-mini' #or any model you want to use
5 api_key: "MY_KEY_HERE"
Once the LLM type has been configured, you can also change the system prompt. As you can see, the system has been told to provide, asides a textual response, an action type, if applicable, that then the mission controller will be able to act upon. This action type is based on the recognized intent and can be acted upon by the mission controller. Specifically:
The
llm_bridgepublishes intents on the /intents topic based on what the LLM recognizes.These intents are then received by the mission controller, which processes them. You can find the code that handles these intents in
llm_app/llm_app/mission_controller.pyto determine what action should be taken.
Finally, build the workspace:
cd ~/ws

colcon build
Testing on the simulator
Before testing on the robot, you can verify the application on the PAL Interaction simulator, that is available on your PAL OS Docker image.
Launch the simulator:
ros2 launch interaction_sim simulator.launch.py
And the application you have just created:
ros2 launch llm_app llm_app.launch.py
This will also run the llm_bridge in the background with your chosen LLM engine.
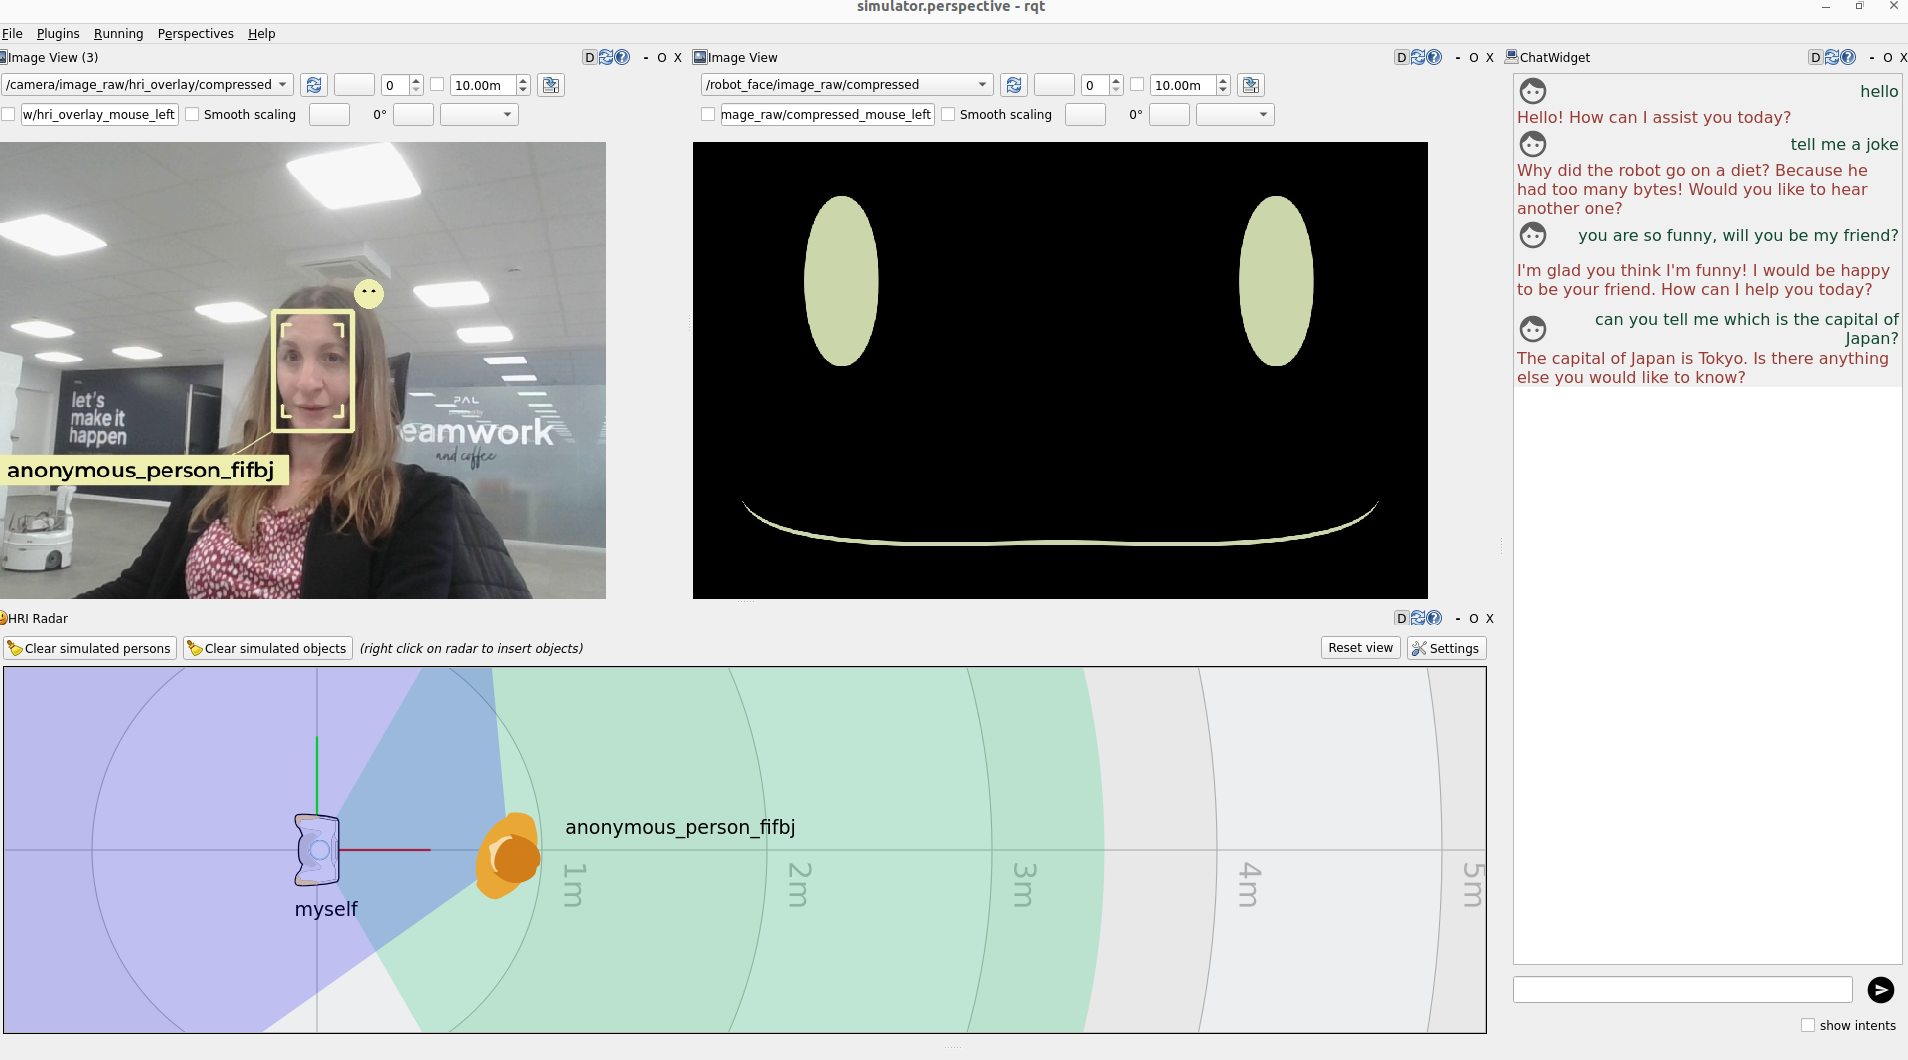
Then you can test using the chat widget on the right side, it should give you the same kind of response as when you interact with the LLM directly.
Deploy the application on the robot
To install your application on the robot, you need to follow the following two steps:
from inside your PAL OS Docker image, go to your development workspace:
cd ~/ws
then run:
ros2 run pal_deploy deploy -p llm_app tiago-pro-head-1c
(replace tiago-pro-head-1c by your actual robot’s hostname)
With the code deployed, you can now ssh onto the robot (ssh pal@tiago-pro-head-1c,
password pal).
Run your application
ssh onto the robot (ssh pal@tiago-pro-head-1c, password pal), and
start your application:
ros2 launch llm_app llm_app.launch.py
This will also run the llm_bridge in the background.
Background behaviours and event-driven programming
The application is based on 📝 Developing robot apps consisting of tasks, skills, and a main application. The most important topic is the /intents topic. When the robot receives a command (or autonomously decides it must do something), it will normally be published as an intent (see below) on the /intents topic.
Our application can already react to some intents. Open another terminal on the robot, and type:
ros2 topic pub /intents -1 hri_actions_msgs/msg/Intent "intent: '__intent_greet__'"
By doing so you manually trigger the intent GREET, and you should hear
the robot say: “Hello!”. You can see the output in the terminal as well:
[run_app-1] [INFO] [1734692200.092676918] [testing]: Received an intent: __intent_greet__
[run_app-1] [INFO] [1734692200.093918579] [testing]: Greeting user <>
[start_task-3] [INFO] [1734692200.961757552] [greet_task]: Accepted a new goal
[start_task-3] [INFO] [1734692200.963895279] [greet_task]: Saying hello to the user
[start_task-3] [INFO] [1734692200.964684334] [greet_task]: Current greeting status: 3
[run_app-1] [INFO] [1734692200.965634167] [testing]: Received feedback: greet_task_msgs.action.Greet_Feedback(status='GREETING_USER')
[start_task-3] [INFO] [1734692200.965892098] [greet_task]: Starting the greeting task
[start_task-3] [INFO] [1734692200.966149704] [greet_task]: Starting by selecting a user to greet.
[start_skill-2] [WARN] [1734692200.966394162] [say_skill]: NEW MESSAGE TO USER: Hello, !
[run_app-1] [INFO] [1734692200.966746865] [testing]: Received feedback: greet_task_msgs.action.Greet_Feedback(status='SELECTING_USER')
[start_task-3] [INFO] [1734692200.967653490] [greet_task]: Greeting successful
Another intent you can test already is the SAY intent:
ros2 topic pub /intents -1 hri_actions_msgs/msg/Intent "{intent: '__intent_say__', data: '{\"object\": \"hello what is up\"}'}"
When it comes to the llm_bridge package, in the background it:
Listens to any speech in
/humans/voices/anonymous_speaker/speech(see /humans/voices/*/speech).Feeds input to the LLM (Ollama or ChatGPT).
Retrieves the response in JSON format:
{
    "suggested_response_to_user": "Hello",
    "next_action": {
        "type": "GREET"
    }
}
Formats the response to an Intents, e.g. if the next action is of type “GREET” it will publish an
__intent_greet__and forwards any text response to thesayskill
To test the LLM, you either talk to the robot, or publish the voice ID and simulated speech:
Publish the voice ID:
ros2 topic pub -1 /humans/voices/tracked hri_msgs/msg/IdsList "ids: ['anonymous_speaker']"
Publish the speech:
ros2 topic pub -1 /humans/voices/anonymous_speaker/speech hri_msgs/msg/LiveSpeech "final: 'tell me a funny joke'"
The llm_bridge will print the following on the terminal, triggering the SAY intent:
[start_node-4] [INFO] [1736246802.324783366] [llm_bridge]: Sending input from user <unknown> to LLM: tell me a funny joke
[start_node-4] [INFO] [1736246802.325238293] [llm_bridge]: Sending request to LLM and waiting for response...
[start_node-4] [INFO] [1736246803.687059494] [llm_bridge]: LLM response: { "suggested_response_to_user":
"Why did the robot go on a diet? Because it had too many bytes!", "next_action":   { "type":   "SAY" } }
[start_node-4] [WARN] [1736246803.687923853] [llm_bridge]: I think the user want to say/answer something. Sending a SAY intent
[run_app-1] [INFO] [1736246803.689891598] [llm_app]: Received an intent: __intent_say__
[start_node-4] [INFO] [1736246803.689915485] [llm_bridge]: Received reset request
[run_app-1] [INFO] [1736246803.690388389] [llm_app]: Saying something to <unknown>
[start_skill-2] [WARN] [1736246803.693249951] [say_skill]: NEW MESSAGE TO USER: Why did the robot go on a diet? Because it had too many bytes!
You can verify intent published with:
ros2 topic echo /intents

 intent: __intent_say__
 data: '{"object": "Why did the robot go on a diet? Because it had too many bytes!"}'
 source: unknown
 modality: __modality_speech__
 priority: 0
 confidence: 0.800000011920929
Hint
If you want to know more about the main concepts and components required to build an application, head now to 📝 Developing robot apps.
Implement your application logic
Let’s see how to customize the default application skeleton.
Intents are usually generated by your robot’s users. For instance, an intent might be generated:
through automatic perception (eg, someone approaches and seems to interact),
through verbal interaction (eg, someone tells the robot to go somewhere)
Let’s go through the template. Open
llm_app/llm_app/mission_controller.py in your favourite text
editor (outside or inside of the Docker image), and read on.
Going through the mission controller code:
The Mission Controller class begins with the __init__()
function.
32def __init__(self) -> None:
33
34    self.get_logger().info("initialising...")
35    #######################################
36    #
37    # TODO: Add here any initialization steps
38    # that should occurs only once.
39    #
This function initializes the class and performs any necessary one-time initialization steps.
The next function is on_intent(), which is responsible for handling
each published intent. It gets called whenever an intent is published.
Inside this function, the first action is to print the received intent using
self.get_logger().info(). After that, you can define how your controller
should react to the received user intent.
48def on_intent(self, msg):
49
50    self.get_logger().info("Received an intent: %s" % msg.intent)
51
52    #######################################
53    #
54    # TODO: Define here how your application
55    # should react when receiving an user
56    # intent.
Following the log message, the code extracts and saves the data provided by the intent, if it exists.
59  try:
60      data = json.loads(msg.data) if msg.data else {}
61  except json.JSONDecodeError:
62      self.get_logger().warn("The intent's data field is not a"
63                               f" valid json object:\n{msg.data}")
64      data = {"raw": msg.data}
65
66  source = msg.source
67  modality = msg.modality
68  confidence = msg.confidence
69  priority_hint = msg.priority
After printing the intent and saving all the information, the next step is the management of the specific intents.
After processing the intent information, the code proceeds to handle specific intents.
The GREET intent and the SAY are made as an example of what you can do.
64if msg.intent == Intent.GREET:
65    self.get_logger().info(f"Greeting user <{source}>")
66    goal = Greet.Goal()
67    goal.person_id = source
68    self._greet_task_future = self._greet_task_client.send_goal_async(
69                                    goal,
70                                    feedback_callback=self.on_feedback)
71
72    self._greet_task_future.add_done_callback(self.on_greet_goal)
The code starts handling the GREET intent. It captures the person_id
and calls the greet_task that will produce a pre-defined greet behaviour
of the robot. You are free to modify the task itself.
Similarly, the code snippet starting from line 73 deals with the
SAY intent. It reads the content to say in data['object'] and starts
say_skill.
73elif msg.intent == Intent.SAY:
74    self.get_logger().info(f"Saying something to <{source}>")
75    goal = SkillControl.Goal()
76    goal.skill_data = data["object"]
77    self._say_skill_future = self._say_skill_client.send_goal_async(
78                                    goal,
79                                    feedback_callback=self.on_feedback)
80
81    self._say_skill_future.add_done_callback(self.on_say_goal)
These code snippets provide examples of how to handle specific intents, but
you can modify them according to your application’s requirements and desired
behavior for each intent. Moreover, you can create new tasks or skills following examples
of greet_task and say_skill for more complex behaviors.
Configure for automatic launch at start-up
You can configure your app to automatically start when the robot is turned on. See Configure an application to launch at start-up for the details.