Getting started
Unboxing TIAGo++
This section explains how to unbox TIAGo++ safely. TIAGo++ is shipped with the flightcase shown in figure:
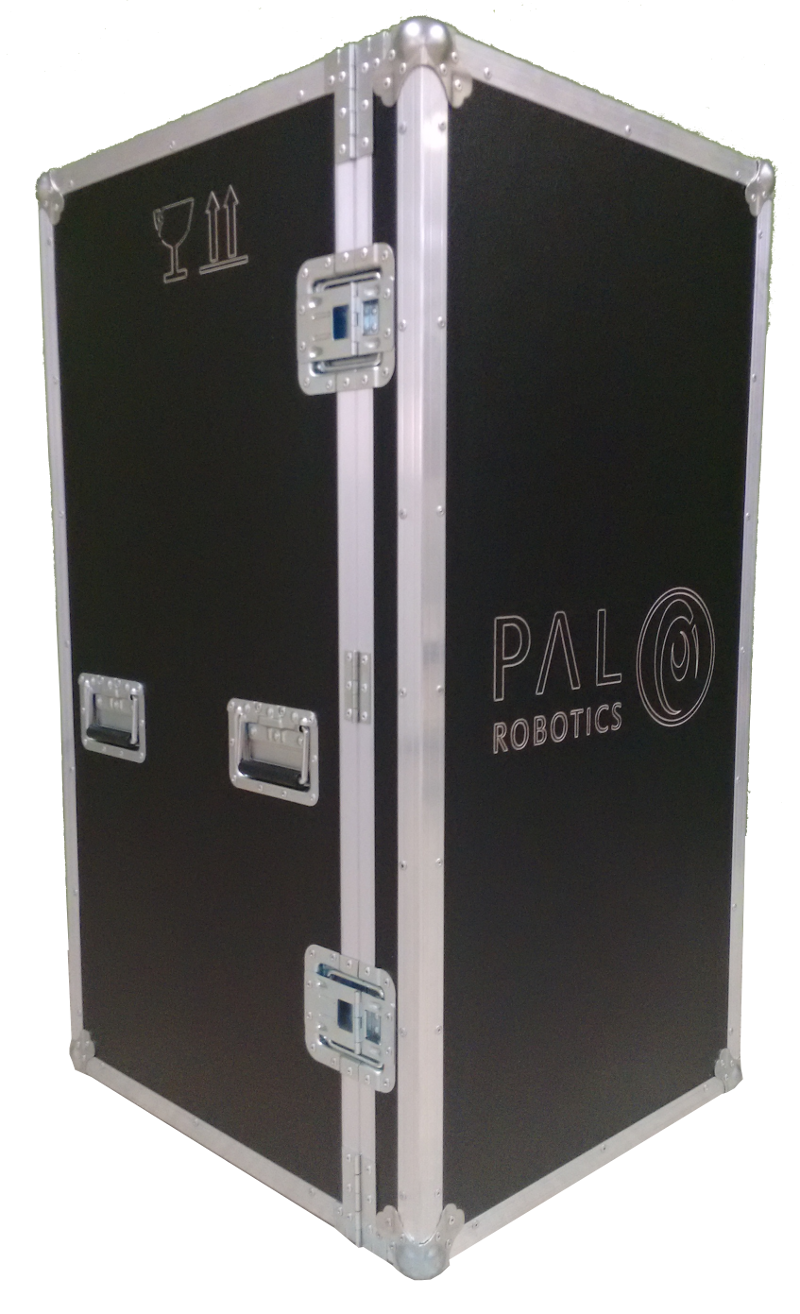
Figure: TIAGo++ flightcase
The flightcase MUST be always transported vertically to ensure the robot’s safety. In order to move the flightcase, pull the handle on the back, as shown in figure below. To place the flightcase in a given location use one of your feet to help you carefully set the flightcase in an upright position.
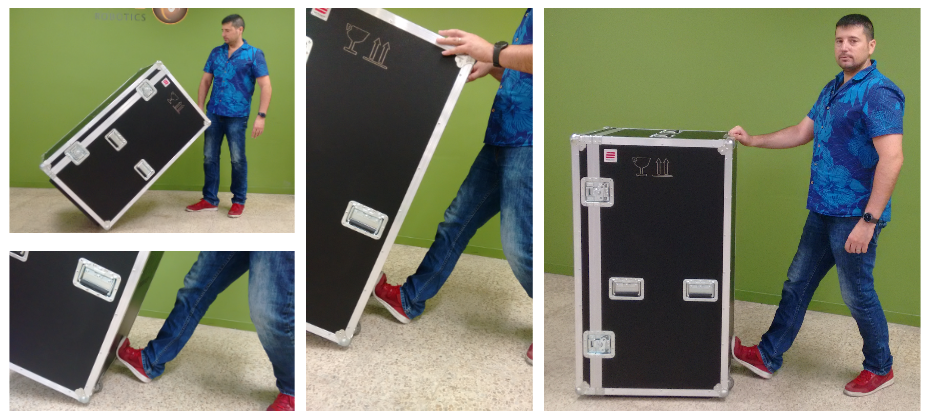
Figure: Moving the fligthcase
Open the door of the crate and unfold the ramp as shown in figure below a. Release the strip that holds the head of the robot, see figure below b, and then remove the foam wedges holding the mobile base as shown in figure below c. Pull out TIAGo++ from the upper part of its torso back, as in figure below d, and then from the upper part of the shoulders as in figure below e in order to have the robot on the ground as in figure below f. Do not pull out the the robot from any part of the mobile base cover as damaged could be caused to you or to the robot.
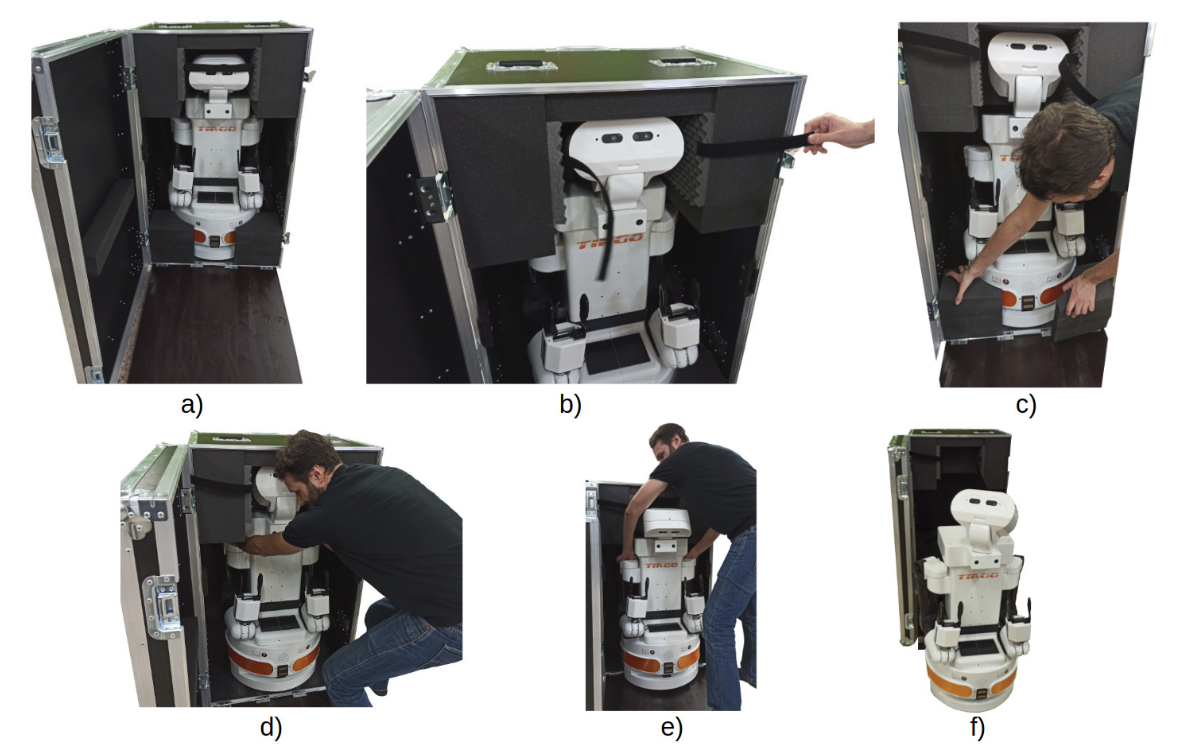
Figure: Unboxing procedure
Turn TIAGo++ on properly
Power up the robot
In order to power on TIAGo++ do as follows:
First of all press the electric switch if necessary in order that its red light indicator is ON, see figure a.
Make sure that the emergency button is released by turning it clockwise, see figure b.
Finally, press the On/Off button during 1 second until the display lights as shown in figure c.
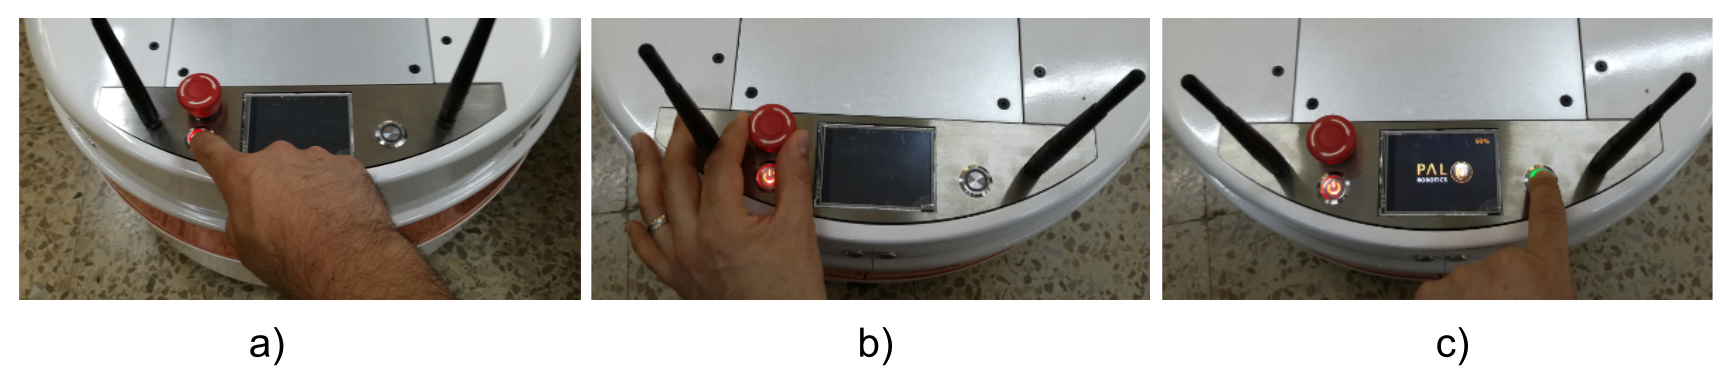
Figure: Start sequence
The robot will be ready when the leds around the mobile base come on.
Setting the arm to a safe pose
Warning
This section presents important information that must be taken into consideration when using the robot. Follow these instructions everytime the robot is used. The procedure described in this section requires to have a clearance of about 1.5 m in front of the robot and at each of its sides in order to execute the required movements safely.
When the robot is started the arm will be lying on top of the mobile base. If the robot is turned on and left on that pose the heat from the arm motors may be transfered, after some time, to the paint of the robot’s lap cover which may end up melting it and causing aesthetical damage to these covers. In order to prevent this the procedure depicted in Figure: Procedure to set the arm in a safe pose and hereafter explained:
Raise the torso to its maximum height using the joystick. In case the torso does not move either press the button Get out of collision in the Demos tab of the WebCommander, see Quick diagnostics and testing with Webcommander section, or run the following command line instruction (note that
tiago-0chas to be adapted so that it contains the serial number of the robot):
export ROS_MASTER_URI=http://tiago-0c:11311
rosservice call /get_out_of_collision
Execute the Offer Both movement using, for instance, the Movements tab of the WebCommander
Exectute the Home motion in order to fold back the arms and the torso into a safe configuration where no contacts occur with the base of the robot.

Figure: Procedure to set the arm in a safe pose
Testing with the joystick
In order to to a quick verification that the robot is able to move some simple motions can be triggered with the provided joystick. First of all make sure that the robot has booted up by waiting until the leds around the mobile base are on. Then, the following buttons can be used to start testing some of the joints of the TIAGo++.
Press the START button as shown in Figure: Give priority to the joystick (first figure) in order to give the priority to the joystick.
Use the joypads in order to make the mobile base move forward and backward, see Figure: Mobile base motions (second figure), and rotate leftwards and rightwards, see third figure.
Press the LB and LT buttons, see Figure: Torso lifter motions (fourth figure), to raise the torso and move it downwards.
Press the X, Y, A and B buttons, see figure Figure: Head motions (last figure), to move the head.
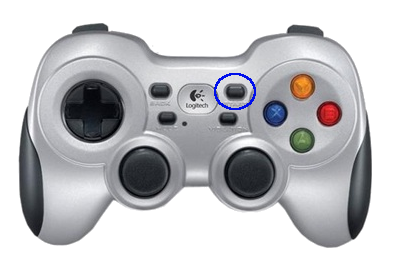
Figure: Give priority to the joystick

Figure: Mobile base motions
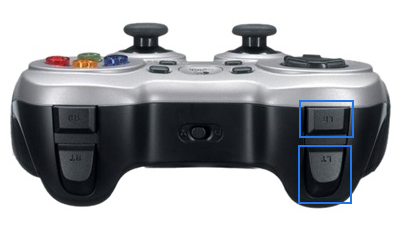
Figure: Torso lifter motions
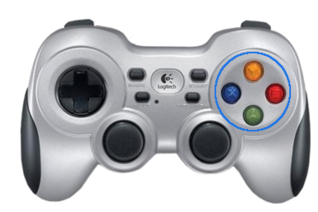
Figure: Head motions
Connect to the robot with Ethernet cable
TIAGo++ has its own internal network accessible through two GigE ports in the user panel, see figure below.

Figure: Connecting to the robot’s network with Ubuntu
When connecting a computer using an Ethernet cable the DHCP server of the robot’s on-board computer
assigns an IP in the range 10.68.0.25-255. The on-board computer has the IP 10.68.0.1 and its name
is tiago-0c where 0 is the serial number without the “0s” on the left. The serial number can be found sticked
on the rear part of the mobile base as shown in figure below. For sake of clarity and without loss of generality the
name tiago-0c will be used hereafter in this documentation. The alias control is also defined for the on-board computer when using direct Ethernet connection.
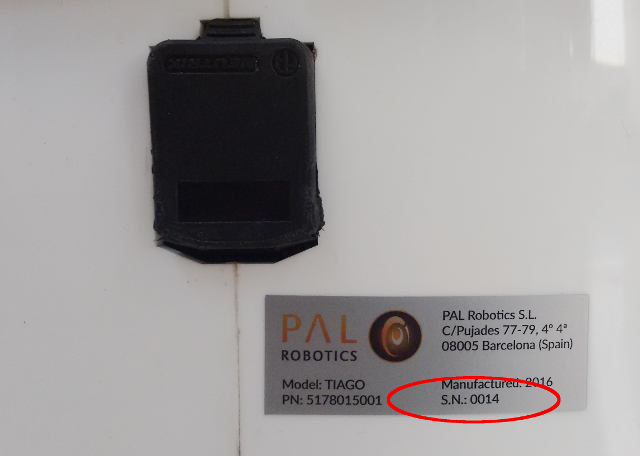
Figure: Connecting to the robot’s network with Ubuntu
The robot must be able to resolve the hostname of the development computers connected to it. Use ifconfig
in order to retrieve the IP that the computer has been given in the robot’s network as shown in Figure: Figure out the IP given to your computer. Note that the IP will be in the range 10.68.0.XXX.
In order to execute ifconfig in the robot’s on-board computer do as follows (the password of the pal user is pal):
ssh pal@tiago-0c
ifconfig
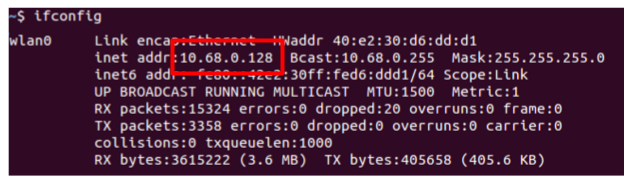
Figure: Figure out the IP given to your computer
Connect to the robot using ssh as root (the password of the root user is palroot):
ssh root@tiago-0c
now execute the following command using the proper IP and the hostname of your computer:
addLocalDns -u hostname -i 10.68.0.128
Note that the addLocalDns needs to be executed everytime the robot is rebooted both because the change
in the robot’s DNS is not persistent and because a different IP may be assigned to your computer by the DHCP of the robot.
Connect to the robot through Wi-Fi
TIAGo++ is delivered and configured as access point and therefore it is possible to connect to its on-board copmuter through a Wi-Fi network advertised by the robot. The credentials of the robot’s default Wi-Fi are shown in table below:
SSID |
tiago_dual-0 |
Channel |
1 |
Mode key |
WPA-PSK |
Password |
|
Robot IP |
10.68.0.1 |
Note that the number in the SSID, in the above example tiago_dual-0, corresponds to the serial number of the robot
as explained in the previous section. The address range 10.68.0.0-24 has been reserved. The on-board
computer can be reached with the name tiago-0c and using the alias control.
The robot must be able to resolve the hostname of the development computers connected to it. Use ifconfig
in order to retrieve the IP that the computer has been given in the robot’s network as shown in figure below. Note
that the IP will be in the range 10.68.0.XXX.
Figure: Figure out the IP given to your computer
Connect to the robot using ssh as root (remember that the password is palroot):
ssh root@tiago-0c
now execute the following command using the proper IP and the hostname of your computer:
addLocalDns -u hostname -i 10.68.0.128
Note that the addLocalDns needs to be executed everytime the robot is rebooted both because the change
in the robot’s DNS is not persistent and because a different IP may be assigned to your computer by the DHCP of the robot.
Quick diagnostics and testing with Webcommander
TIAGo++ has a HTML interface named Webcommander accessible via the http://tiago-0c:8080 URL, see figure below:
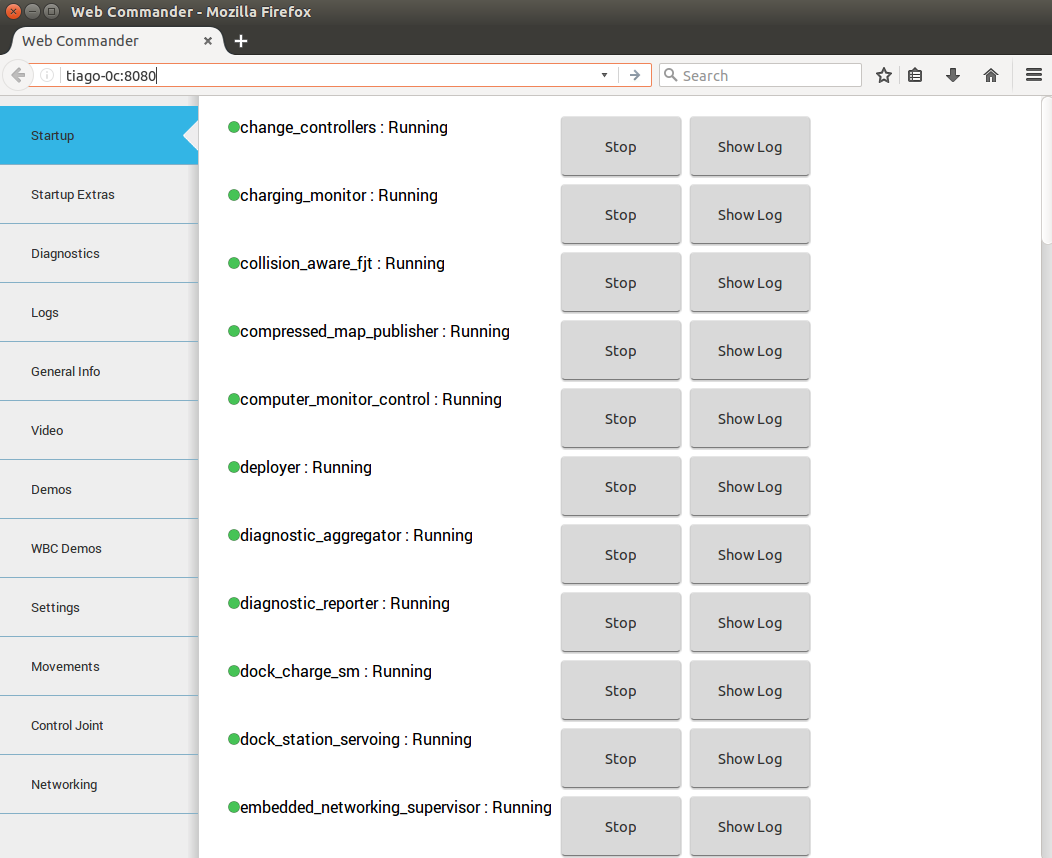
Fig: Webcommander the HTML interface of TIAGo++
This interface provides, among other information, the list of running nodes, graphical diagnostics of the different hardware and software functionalitites, network configuration menu, etc.
Programming TIAGo++
In order to start programming TIAGo++ it is necessary to install a development computer using the pen drive provided with the robot. Detailed instructions on how to install a development computer are provided in the handbook in Chapter Software recovery and Section Development computer installation.

Fig: An external computer is required for programming TIAGo++
Shutting TIAGo down properly
In order to safely shut down the robot follow the procedure shown in figure below must be followed.
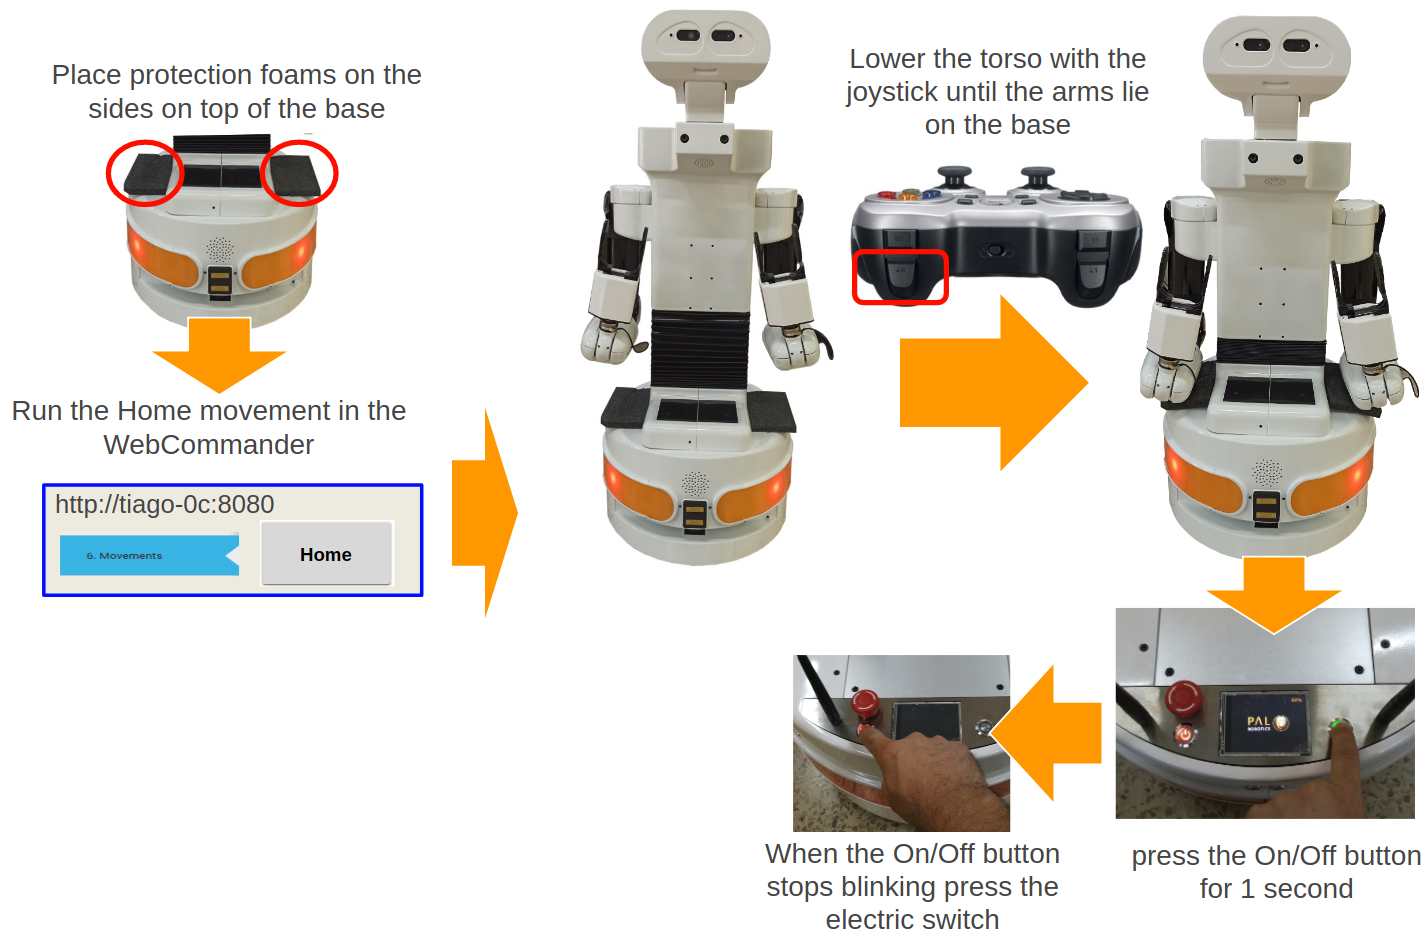
Figure: Shutdown procedure
Press the electric switch so that its red light turns off in case you are not using the robot for several days or when transporting it to another location.
Charging TIAGo++
In order to charge TIAGo++ the procedure shown in figure below must be followed.
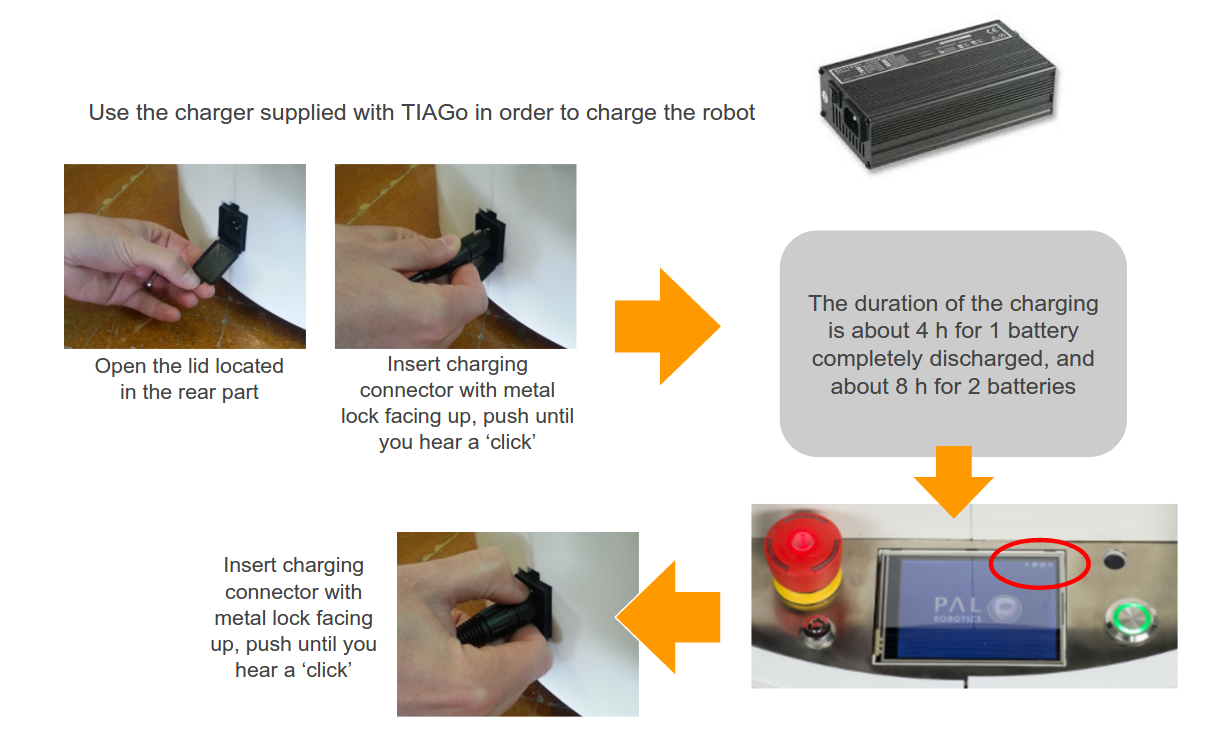
Figure: Charging procedure